MCP tools
Model Context Protocol (MCP) provides a standard way to build services that LLMs can use to gain context. This includes a standard way to provide tools (i.e., functions) for an LLM to call from another program or machine. There are now many useful MCP server implementations available to help extend the capabilities of your chat application with minimal effort.
In this article, you’ll learn how to both register existing MCP tools with chatlas as well as author your own custom MCP tools.
To leverage MCP tools from chatlas, you’ll want to install the mcp extra.
pip install 'chatlas[mcp]'Registering tools
Quick start
Let’s start with a practical example: using the MCP Fetch server to give an LLM the ability to fetch and read web pages. This server is maintained by Anthropic and can be run via uvx (which comes with uv).
For simplicity and convenience, we’ll use the .register_mcp_tools_stdio_async() method to both run the MCP Fetch server locally and register its tools with our ChatOpenAI instance:
import asyncio
from chatlas import ChatOpenAI

async def main():
    chat = ChatOpenAI()
    await chat.register_mcp_tools_stdio_async(
        command="uvx",
        args=["mcp-server-fetch"],
    )
    await chat.chat_async(
        "Summarize the first paragraph of https://en.wikipedia.org/wiki/Python_(programming_language)"
    )
    await chat.cleanup_mcp_tools()

asyncio.run(main())
# 🔧 tool request
fetch(url="https://en.wikipedia.org/wiki/Python_(programming_language)")Python is a high-level, general-purpose programming language known for its emphasis on code readability through significant indentation. It supports multiple programming paradigms including structured, object-oriented, and functional programming, and is dynamically typed with garbage collection.
For providers with native web fetch support (Claude, Google), consider using tool_web_fetch() instead – it’s simpler and doesn’t require MCP setup. Similarly, tool_web_search() provides native web search for OpenAI, Claude, and Google.
Basic usage
Chatlas provides two ways to register MCP tools:
- Stdio (
.register_mcp_tools_stdio_async()) - Streamble HTTP
.register_mcp_tools_http_stream_async().
The main difference is how they communicate with the MCP server: the former (Stdio) executes a system command to run the server locally, while the latter (HTTP) connects to an already running HTTP server.
This makes the Stdio method more ergonomic for local development and testing. For instance, recall the example above, which runs uvx mcp-server-fetch locally to provide web fetching capabilities to the chat instance:
# Run a server via uvx, npx, or any other command
await chat.register_mcp_tools_stdio_async(
    command="uvx",
    args=["mcp-server-fetch"],
)
On the other hand, the HTTP method is better for production environments where the server is hosted remotely or in a longer-running process. For example, if you have an MCP server already running at http://localhost:8000/mcp, you can connect to it as follows:
# Connect to a server already running at the specified URL
await chat.register_mcp_tools_http_stream_async(
    url="http://localhost:8000/mcp",
)For performance, the methods for registering MCP tools are asynchronous, so you’ll need to use await when calling them. In some environments, such as Jupyter notebooks and the Positron IDE console, you can simply use await directly (as is done above). However, in other environments, you may need to wrap your code in an async function and use asyncio.run() to execute it. The examples below use asyncio.run() to run the asynchronous code, but you can adapt them to your environment as needed.
Note that these methods work by:
- Opening a connection to the MCP server
- Requesting the available tools and making them available to the chat instance
- Keeping the connection open for tool calls during the chat session
This means, when you no longer need the MCP tools, it’s good practice to clean up the connection to the MCP server, as well Chat’s tool state. This is done by calling .cleanup_mcp_tools() at the end of your chat session (the examples demonstrate how to do this).
Advanced example: Code execution
Let’s look at a more compelling use case for MCP tools: code execution. A tool that can execute code and return the results is a powerful way to extend the capabilities of an LLM. This way, LLMs can generate code based on natural language prompts (which they are quite good at!) and then execute that code to get precise and reliable results from data (which LLMs are not so good at!). However, allowing an LLM to execute arbitrary code is risky, as the generated code could potentially be destructive, harmful, or even malicious.
To mitigate these risks, it’s important to implement safeguards around code execution. This can include running code in isolated environments, restricting access to sensitive resources, and carefully validating and sanitizing inputs to the code execution tool. One such implementation is Pydantic’s Run Python MCP server, which provides a sandboxed environment for executing Python code safely via Pyodide and Deno.
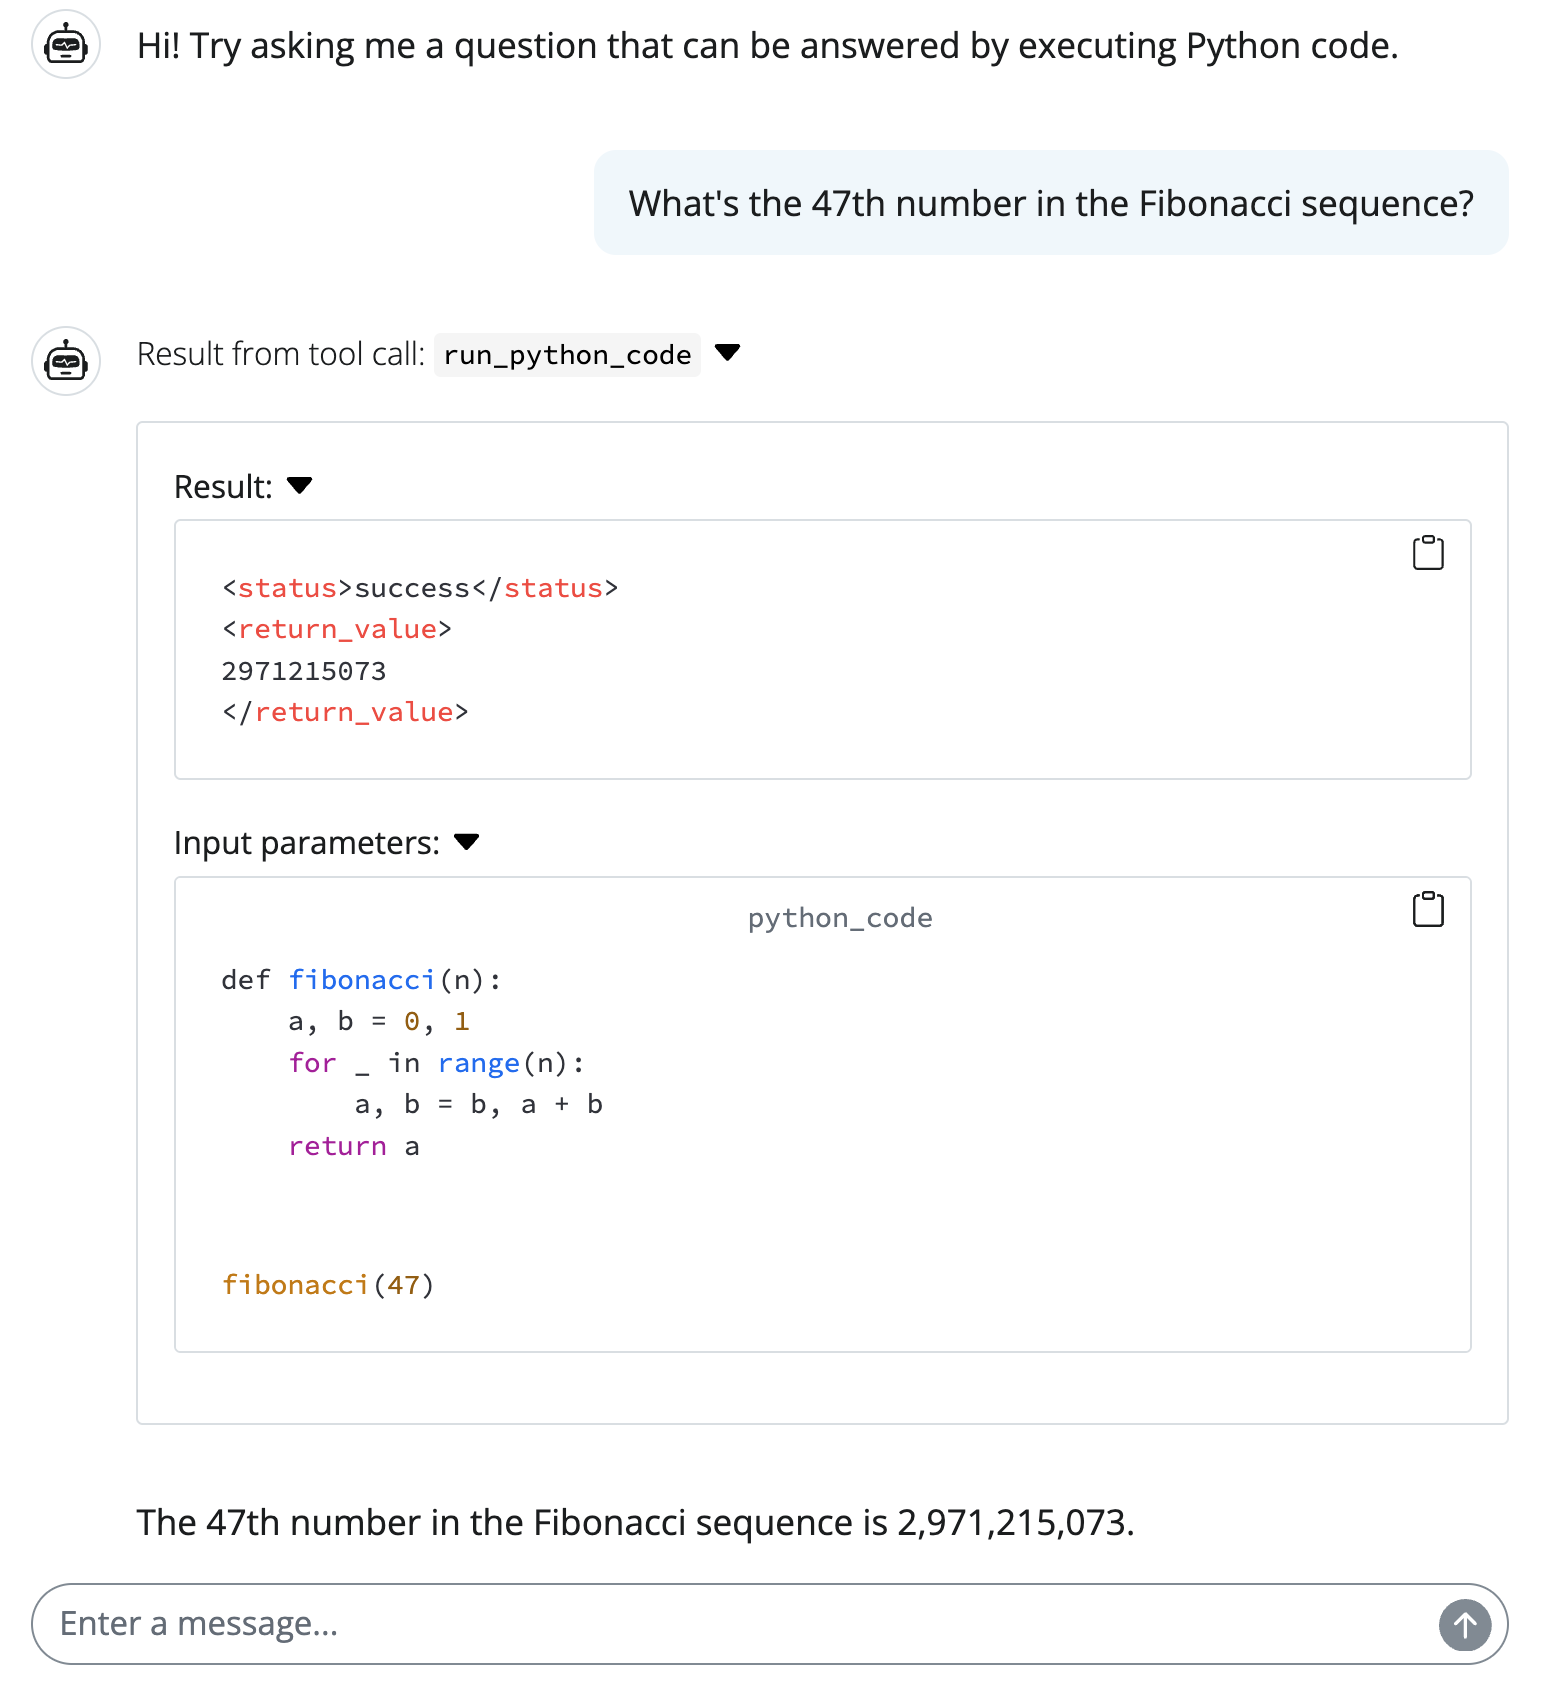
Below is a Shiny chatbot example that uses the Pydantic Run Python MCP server to execute Python code safely. Notice how, when tool calls are made, both the tool request (i.e., the code to be executed) and result (i.e., the output of the code execution) are displayed in the chat, making it much easier to understand what the LLM is doing and how it arrived at its answer. This is a great way to build trust in the LLM’s responses, as users can see exactly what code was executed and what the results were.
from chatlas import ChatOpenAI
from shiny import reactive
from shiny.express import ui

chat_client = ChatOpenAI()

@reactive.effect
async def _():
    await chat_client.register_mcp_tools_stdio_async(
        command="deno",
        args=["run", "-N", "-R=node_modules", "-W=node_modules", "--node-modules-dir=auto", "jsr:@pydantic/mcp-run-python", "stdio"],
    )


chat = ui.Chat("chat")
chat.ui(
    messages=["Hi! Try asking me a question that can be answered by executing Python code."],
)
chat.update_user_input(value="What's the 47th number in the Fibonacci sequence?")

@chat.on_user_submit
async def _(user_input: str):
    stream = await chat_client.stream_async(user_input, content="all")
    await chat.append_message_stream(stream)