Terminal Recordings
Great Docs includes Termshow, a complete solution for recording, editing, and presenting terminal sessions in your documentation. A Termshow recording captures everything you type and see in a terminal with precise timing, stores it in a lightweight format, and renders it as an interactive player on your site.
Unlike video files or animated GIFs, Termshow recordings render as crisp SVGs at any zoom level, require no external hosting, and work offline. The full pipeline lives inside Great Docs: record, annotate, and embed with a single shortcode. For annotation, you can either edit the YAML script file directly or use the Termshow Editor, a browser-based visual editor that lets you add chapters, annotations, and cuts by dragging and clicking rather than writing timestamps by hand.
Here’s what a Termshow recording looks like in action. This one shows a typical workflow: installing a package and verifying it:

The player above is paused at each chapter boundary, waiting for you to press play. This is the recommended presentation mode for tutorials: each chapter represents one logical step, giving readers time to absorb what happened before moving on. Click the play button (or press Space) to advance through each chapter at your own pace.
The two chapters in this demo correspond to the two stages of the workflow: installing the package and verifying the result. You define chapters in a companion YAML file, and the player renders gold markers on the timeline at each boundary.
Quick Start
1. Record a session
Save recordings in your project’s assets/ directory, which is automatically available to the shortcode at build time.
great-docs termshow record assets/install-guide.termshowThis launches a recording session in your terminal. Everything you type and see is captured with precise timing. Press Ctrl+D or type exit to end.
During the session, you will see status messages confirming the recording is active:
Recording... (cols=80, rows=24)
Press Ctrl+D or type 'exit' to stop.
These messages are for your benefit only. They are automatically stripped from the saved file so viewers never see recorder diagnostics in the final output.
The command creates two files:
assets/install-guide.termshow: the raw recordingassets/install-guide.termshow.yml: a script template with commented sections
With the raw recording saved and the script template in place, you’re ready to shape the presentation.
2. Edit the script file
Open assets/install-guide.termshow.yml and uncomment/fill in the sections you need (or use the Termshow Editor with great-docs termshow edit assets/install-guide.termshow):
source: assets/install-guide.termshow

settings:
  window_chrome: colorful

chapters:
  - at: 0.0
    label: Setup
  - at: 8.0
    label: Install
  - at: 15.0
    label: Verify

annotations:
  - at: 1.0
    duration: 3.0
    text: Start by activating the virtual environment
    position: top-right
    style: callout
3. Embed in a page
{{< termshow file="assets/install-guide" pause_on_chapters="true" >}}That single line is all you need. The shortcode handles discovery, rendering, and embedding automatically during the build step.
4. Build
great-docs buildDuring the build, Great Docs automatically finds all .termshow files, renders them into SVG keyframes, and embeds the data inline in your HTML pages. No runtime fetches are needed.
That’s the entire workflow: record, annotate, embed, and build. The following sections cover each piece in detail.
The Recording Format
A Termshow recording consists of two files that work together: a raw capture file (.termshow) and an optional script file (.termshow.yml). The capture file stores exactly what happened in the terminal with precise timing. The script file layers presentation choices on top: where to place chapters, what annotations to show, which segments to cut. This separation means you never need to re-record just to change how something is presented.
.termshow files
The raw recording is stored as NDJSON (newline-delimited JSON). The first line is a header with terminal metadata; subsequent lines are events:
{"version": 1, "format": "termshow", "term": {"cols": 80, "rows": 20}, "title": "My Demo"}
[0.5, "o", "$ "]
[0.0, "i", "echo hello"]
[0.1, "o", "echo hello"]
[0.6, "o", "\r\nhello\r\n"]
[1.0, "m", "Step complete"]
[0.3, "o", "$ "]
[0.0, "i", "date"]
[0.1, "o", "date"]
[0.4, "o", "\r\nWed May 28 09:15:03 UTC 2026\r\n"]
Each event is [delay_seconds, type, data]. The delay is relative to the previous event (not absolute), and the type code identifies what kind of data the event carries:
| Type | Meaning |
|---|---|
"o" |
Output: data written to the terminal |
"i" |
Input: user keystrokes (for display) |
"m" |
Marker: internal sync point for chapters |
You rarely need to edit .termshow files by hand. The recorder and importer produce them, and the script file controls how they are presented.
.termshow.yml script files
The companion YAML file controls how the recording is presented. It adds chapters, annotations, cuts, highlights, and visual settings:
source: assets/my-recording.termshow

settings:
  window_chrome: colorful     # Window decoration style
  theme: monokai              # Terminal color scheme
  font_family: "JetBrains Mono, Fira Code, monospace"
  font_size: 14               # Font size in rendered SVG (px)
  line_height: 1.2            # Line height multiplier
  padding: 12                 # Inner padding (px)
  prompt: "❯"                 # Replace detected prompts with ❯

chapters:
  - at: 0.0
    label: Introduction
  - at: 5.0
    label: Configuration
  - at: 12.0
    label: Running Tests

annotations:
  - at: 1.0
    duration: 3.0
    text: This installs all required dependencies
    position: top-right
    style: callout
  - at: 6.0
    duration: 2.5
    text: Configuration is auto-detected
    position: bottom-right
    style: subtle

cuts:
  - from: 8.0
    to: 11.0
    type: ellipsis

highlights:
  - at: 12.5
    duration: 3.0
    target:
      match: 'All \\d+ tests passed'
    style: spotlight
    color: "#50fa7b"
    fade_in: 0.3
All fields are optional except source. Start with just chapters and add annotations, cuts, or highlights as you refine the presentation.
Settings Reference
The settings block in your .termshow.yml controls how the recording is rendered into SVG frames. All settings are optional and have sensible defaults.
| Setting | Default | Description |
|---|---|---|
window_chrome |
colorful |
Window decoration style |
theme |
(auto) | Terminal color scheme |
font_family |
(system stack) | Font family for rendered SVG |
font_size |
14 |
Font size in px |
line_height |
1.2 |
Line height multiplier |
padding |
12 |
Inner padding in px |
prompt |
(none) | Prompt replacement character |
prompt_pattern |
(none) | Prompt detection regex |
The window_chrome setting accepts colorful (traffic-light buttons), plain (grey dots), or none (no title bar). The font_family value is a comma-separated list passed directly to the SVG font-family attribute. The prompt and prompt_pattern settings work together for prompt substitution, described in the next section.
These settings are applied at render time. Changing them requires re-rendering but not re-recording.
Prompt Substitution
Terminal recordings often contain shell prompts that are visually noisy or environment-specific (e.g., user@host:~/project $). The prompt substitution feature lets you replace the prompt character in rendered output with a clean, consistent symbol.
Configuration
Add prompt (and optionally prompt_pattern) to your script’s settings block:
settings:
  prompt: "❯"
This replaces detected prompt characters with ❯ in all rendered frames. Common replacement choices include $, %, #, >, ❯, and →.
How detection works
Prompt substitution uses a three-tier detection strategy, applied in order of precision:
Structural detection (most precise): If the recording contains input (
"i") events, the renderer correlates them with cursor position to identify exactly which rows have prompts and where the prompt character sits. This is fully automatic and requires no additional configuration.Pattern detection (explicit): If you provide
prompt_pattern, the renderer uses it as a regex to match prompt lines. The last character of the match is replaced. Use this when your recording lacks input events or when the structural detection doesn’t match your prompt format:settings: prompt: "$" prompt_pattern: '^\S+@\S+[^$]*\$ 'Heuristic detection (automatic fallback): When neither input events nor a pattern are available, the renderer scans each row for lines that begin with a known prompt character (
$,%,#,>,❯,→, etc.) followed by a space. This works well for simple prompt formats.
The tiers are tried in order: structural first, then pattern, then heuristic. Once a tier matches a given row, the lower tiers are skipped for that row. In practice, most recordings have input events and structural detection handles everything automatically.
Examples
Replace a verbose prompt with a minimal symbol:
settings:
  prompt: "❯"
Before: user@dev:~/project$ echo hello
After: ❯ echo hello
Use a regex for non-standard prompts:
settings:
  prompt: "$"
  prompt_pattern: '^\(venv\) .*\$ '
This matches prompts like (venv) user@host:~$ and replaces just the $ character.
Tips
Here are some practical guidelines for working with prompt substitution:
- start with just
prompt: structural and heuristic detection handle most cases automatically - add
prompt_patternonly if the default detection misidentifies prompt lines - the substitution affects rendered SVG frames only (the raw recording is never modified)
- the Termshow Editor shows prompt substitution live in the preview, so you can see the effect immediately as you configure it
In most cases, a single prompt line in your settings block is all you need. The detection system is designed to do the right thing without manual tuning.
Shortcode Reference
Embed a Termshow recording in any page with the termshow shortcode. At its simplest, you only need the file path:
{{< termshow file="assets/my-demo" >}}The shortcode discovers the companion .termshow.yml script, renders the recording into SVG frames, and embeds everything inline during the build. No additional configuration or runtime fetches are required.
Options
The shortcode accepts the following options to control player behavior:
| Option | Default | Description |
|---|---|---|
file |
(required) | Path to the .termshow file (without extension) |
autoplay |
"false" |
Start playing automatically on page load |
loop |
"false" |
Loop playback when reaching the end |
speed |
"1" |
Initial playback speed multiplier |
pause_on_chapters |
"false" |
Auto-pause at each chapter boundary |
controls |
"true" |
Show the control bar |
theme |
"auto" |
Player theme: auto, dark, or light |
All options are specified as key-value attributes on the shortcode. Unrecognized options are silently ignored, so you can safely add new ones as they become available.
Examples
The following examples show common shortcode patterns, from a minimal embed to more tailored presentations.
A basic embed with default settings (manual play, 1× speed, controls visible):
{{< termshow file="assets/getting-started" >}}A chapter-pausing tutorial that stops at each chapter boundary so readers can follow along:
{{< termshow file="assets/workflow" pause_on_chapters="true" >}}A fast autoplay preview for hero sections or landing pages:
{{< termshow file="assets/quick" autoplay="true" speed="1.5" >}}Combine options freely. For instance, autoplay with loop creates a continuously cycling demonstration, while pause_on_chapters with speed="1.5" produces a brisk but controlled tutorial.
The shortcode is the only integration point between your Quarto pages and the Termshow pipeline. Everything else (recording, scripting, rendering) happens automatically during the build.
Player Controls
The embedded player provides interactive controls for navigating recordings. The following sections describe what each component does.
Control Bar
The control bar sits along the bottom edge of the player and provides everything you need to navigate a recording. Its elements are arranged left to right:
- Play / Pause / Replay: Toggles playback. Shows ↺ at the end of the recording.
- Elapsed time: Current playback position.
- Timeline: Click anywhere to seek. Gold chapter markers indicate chapter boundaries; their hit targets are wider than the visible marks for easy clicking.
- Remaining time: Counts down to zero during playback.
- Speed: Cycles through 0.5×, 1×, 1.5×, 2×, 3×.
All controls are keyboard-accessible and respond to the shortcuts listed below.
Chapter Bar
A semi-transparent overlay at the top of the player displays the current chapter name. It updates as playback progresses and when pausing at chapter boundaries.
Center Overlay
The center overlay provides a large, easy-to-hit target for the most common playback actions. It appears as a semi-transparent button in the middle of the viewport and adapts to the current player state:
- Before playback: Shows ▶ as a play call-to-action.
- After playback ends: Shows ↺. Clicking it returns the player to its initial state (frame 0) without auto-playing.
- During chapter pauses: Hidden, so the terminal content remains fully visible for reading.
The overlay never obscures content during active playback; it only appears when the player is waiting for user input.
Double-Tap to Seek
During playback (or when the recording has ended), double-tapping or double-clicking the left or right third of the viewport seeks backward or forward by 5 seconds. This mirrors the seek gesture familiar from video players: tap the left edge to rewind, or the right edge to skip ahead. Taps in the middle 40% of the viewport are ignored to avoid conflicts with the center overlay.
Keyboard Shortcuts
The player supports keyboard navigation once it has focus. Click anywhere on the viewport to activate it, then use the following keys:
| Key | Action |
|---|---|
Space |
Play / Pause (or reset from ended state) |
→ |
Seek forward 5 seconds |
← |
Seek backward 5 seconds |
] |
Jump to next chapter |
[ |
Jump to previous chapter |
All shortcuts require the player to have focus. Click anywhere on the player viewport first.
Chapters
Chapters divide a recording into labeled sections. They appear as gold markers on the timeline and enable pause_on_chapters mode for step-by-step tutorials.
chapters:
  - at: 0.0
    label: Introduction
  - at: 5.0
    label: Installation
  - at: 12.0
    label: Configuration
The at field is the timestamp in seconds. The label is shown in the chapter bar and as a tooltip on the timeline marker.
Tips
Here are some guidelines for effective chapter placement:
- Place chapters at logical transitions. Each should represent one distinct step.
- The first chapter at
0.0names what’s on screen before the viewer presses play. - Use
pause_on_chapters="true"for tutorials where readers need time to absorb each step.
Well-placed chapters transform a continuous recording into a structured, navigable lesson that readers can work through at their own pace.
Annotations
Annotations are contextual overlays that appear at specific timestamps to explain what’s happening in the terminal:
annotations:
  - at: 2.0
    duration: 3.0
    text: This installs all dependencies from requirements.txt
    position: top-right
    style: callout
    width: medium
Annotations are purely presentational: they don’t affect timing or terminal output, and you can add or remove them at any point without re-recording.
Styles
Each annotation has a style that controls its visual weight:
| Style | Appearance |
|---|---|
callout |
Dark semi-opaque card with accent border: draws focus |
subtle |
Lighter, smaller text: less intrusive |
highlight |
Amber-tinted with warm border: strong emphasis |
Choose the style that matches the annotation’s importance. Most recordings need only callout and subtle; reserve highlight for critical warnings or pivotal steps.
Positions
Annotations can be placed at any edge or corner of the terminal viewport:
| Position | Placement |
|---|---|
top-left |
Top-left corner |
top |
Top center |
top-right |
Top-right corner |
left |
Vertically centered, left edge |
right |
Vertically centered, right edge |
bottom-left |
Bottom-left corner |
bottom |
Bottom center |
bottom-right |
Bottom-right corner (default) |
Place annotations where they won’t cover the terminal text you’re explaining. top-right is a good default because most CLI output scrolls along the left edge.
Width
Control how wide an annotation can grow with the width field:
| Width | Max width |
|---|---|
small |
25% of the viewport |
medium |
50% of the viewport (default) |
large |
75% of the viewport |
Use small for brief one-word labels, large for longer explanations that need breathing room.
Tips
Keep these principles in mind when adding annotations:
- Keep text to one sentence. Annotations complement the terminal output, not replace it.
- Use
calloutfor important explanations,subtlefor minor context. - Ensure
durationis long enough to read at 1.5× speed.
Good annotations enhance comprehension without competing with the terminal content for the viewer’s attention. When in doubt, shorter and fewer is better.
Cuts
Terminal recordings often contain dead time: waiting for a package to download, watching a progress bar crawl, or pausing to think about the next command. Cuts let you remove these segments from the viewer’s experience without re-recording. The raw file stays intact; cuts are purely a playback instruction that tells the player to skip a time range.
cuts:
  - from: 8.0
    to: 11.0
    type: ellipsis
The from and to fields define the time range to skip (in seconds). The type field controls what viewers see during the cut:
| Value | Effect |
|---|---|
jump |
Seamless jump (no visual indicator) |
ellipsis |
Shows “…” briefly to indicate skipped time |
Use jump for short gaps where continuity isn’t important (e.g., trimming a 2-second pause between commands). Use ellipsis for longer skips where viewers should know time was removed (e.g., a 30-second download reduced to a single “…” flash).
Cuts are non-destructive: they are stored in the script file, not applied to the raw recording. You can always remove or adjust them later.
Snippets
Snippets let you add a copy button to the player that appears during a time range. When visible, readers can click it to copy the associated text to their clipboard: no manual retyping needed.
snippets:
  - at: 0.5
    duration: 7.0
    text: "pip install great-tables"
    label: Install
  - at: 8.0
    duration: 6.0
    match: '\$ (.+)'
    label: Verify
You can provide text in two ways:
text: a literal string that gets copied verbatimmatch: a regex run against the terminal buffer at that moment; copies the first capture group (or the full match if no group is defined)
If both are set, match takes priority (with text as fallback if the regex doesn’t match).
Fields
Each snippet entry in the YAML accepts the following fields:
| Field | Default | Description |
|---|---|---|
at |
(required) | Time in seconds when the button appears |
duration |
5.0 |
How long the button stays visible |
text |
"" |
Literal text copied to the clipboard on click |
match |
"" |
Regex pattern matched against the visible terminal text |
label |
"Copy" |
Button label shown alongside the copy icon |
At least one of text or match must be provided.
The button fades in and out smoothly, just like annotations. It appears in the title bar at the far right of the player. Only one snippet button is visible at a time. If time ranges overlap, the first one wins and subsequent ones are hidden.
Tips
Practical guidance for working with snippets:
- Snippet time ranges must not overlap. The Editor enforces this; if you write overlapping ranges manually in YAML, only the first active snippet is shown.
- Align snippets with chapters: set
atto the chapter start time anddurationto the chapter length. This way the copy button is visible for the entire step. - Use
textwhen you know the exact string (e.g., apip installinvocation). Don’t include prompts ($). - Use
matchwhen the text is dynamic or you want to extract from what’s visible. For example,'\$ (.+)'matches any shell prompt line and captures just the command. Use single quotes in YAML to avoid backslash escape issues. - Use
labelto give context (e.g., “Install”, “Build”, “Test”) so readers know what they’re copying without reading the full snippet. - Snippets work regardless of playback state: readers can copy while paused, playing, or at a chapter stop.
Snippets bridge the gap between watching and doing. By giving readers one-click access to the exact commands shown in the recording, you eliminate transcription errors and reduce friction.
Highlights
Highlights draw attention to specific terminal text during playback. Unlike annotations (which float in corners), highlights are attached to the terminal text itself: they decorate characters in-place, can follow scrolling, and support rich adornment styles.
Multiple highlights can be active simultaneously, and overlapping highlights stack naturally (later ones render on top).
highlights:
  - at: 8.0
    duration: 2.0
    target:
      region: { row: 5, col: 0, width: 40, height: 1 }
    style: box
    color: "#f1fa8c"
  - at: 10.0
    duration: 4.0
    target:
      match: 'Successfully installed (.+)'
      group: 1
    style: spotlight
    color: "#50fA7B"
Targeting
A highlight must identify which text to decorate. Three targeting modes are available:
| Mode | YAML Key | Description |
|---|---|---|
| Region | target.region |
Fixed rectangle: { row, col, width, height } (0-indexed) |
| Pattern | target.match |
Regex matched against the visible terminal text each frame |
| Lines | target.lines |
List of 0-indexed row numbers to highlight entirely |
For pattern matches, an optional target.group (default 0) selects which capture group to highlight. This lets you match context (e.g., a full line) while only decorating the interesting part (e.g., a flag name).
Scroll tracking. Terminal output scrolls. A region-based highlight is positional: row 5 stays at row 5 even after scrolling pushes new content into that row. Set target.track_scroll: true to have the highlight follow the matched text as it moves. Scroll tracking only works with target.match (the renderer re-runs the regex each frame to locate the text’s new position):
highlights:
  - at: 20.0
    duration: 8.0
    target:
      match: 'error:'
      track_scroll: true
    style: underline-wavy
    color: "#ff5555"
Styles
Each highlight has a style that controls its visual adornment:
| Style | Visual | Notes |
|---|---|---|
box |
Bordered rectangle around text | Default style; technical look |
underline |
Underline beneath text | Solid or wavy (set via subtype) |
background |
Semi-transparent background fill | Good for multi-line selections |
spotlight |
Dims everything except the target | Viewport-wide dimming with cutout |
badge |
Small label pill adjacent to text | Position: before or after |
bracket |
Curly brace spanning lines | For grouping multiple rows |
Badge Details
Badge style attaches a small inline pill adjacent to the highlighted text:
highlights:
  - at: 18.0
    duration: 5.0
    target:
      match: '--verbose'
    style: badge
    badge_text: "recommended"
    color: "#8be9fd"
The badge_text field sets the label inside the badge. Use the badge position control in the Properties Panel to place it before or after the matched text. Badges will wrap to the opposite side if they would overflow the viewport.
Animation & Transitions
Highlights support animated entry and exit:
| Field | Default | Description |
|---|---|---|
fade_in |
0 |
Duration of the appear transition (seconds) |
fade_out |
0 |
Duration of the disappear transition (seconds) |
pulse |
false |
Gentle pulsing animation that loops continuously |
When pulse is enabled, the highlight’s opacity oscillates between 100% and 50% on a 1.5-second cycle with an ease-in-out curve. The animation runs for the entire duration of the highlight. This works well for drawing attention to transient output or short-lived highlights where you want sustained visual emphasis.
Fields Reference
The complete set of fields available for each highlight entry:
| Field | Default | Description |
|---|---|---|
at |
(required) | Time in seconds when the highlight appears |
duration |
(required) | How long the highlight remains visible |
target |
(required) | Targeting object (see above) |
style |
"box" |
Adornment style (see table above) |
color |
"#f1fa8c" |
Adornment color (hex or rgba) |
opacity |
1 |
Overall opacity of the highlight (0–1) |
badge_text |
"" |
Label text for badge styles |
pulse |
false |
Enable pulsing animation |
fade_in |
0 |
Appear transition duration (seconds) |
fade_out |
0 |
Disappear transition duration (seconds) |
Only at, duration, and target are required. All other fields have sensible defaults and can be omitted for simple highlights.
Examples
The following examples illustrate common highlight patterns, from simple region markers to animated spotlights.
Highlight a fixed region of the terminal:
highlights:
  - at: 3.0
    duration: 4.0
    target:
      region: { row: 2, col: 0, width: 80, height: 3 }
    style: background
    color: "rgba(255, 184, 108, 0.15)"
Call out a specific flag using regex with a badge:
highlights:
  - at: 12.0
    duration: 5.0
    target:
      match: '--output'
    style: badge
    badge_text: "new in v2"
    color: "#bd93f9"
Spotlight an important result (dims the rest of the viewport):
highlights:
  - at: 10.0
    duration: 3.0
    target:
      match: 'All tests passed'
    style: spotlight
    color: "#50fa7b"
    fade_in: 0.3
    fade_out: 0.3
These patterns combine freely. A single recording might use background for broad context, badge to label a new flag, and spotlight for the final result (layering visual cues without competing for attention).
Tips
Guidelines for effective use of highlights:
- Highlights are purely visual: they don’t affect timing or terminal output.
- Multiple highlights can overlap in time. Unlike snippets, there is no exclusivity rule.
- Use
spotlightsparingly: it dims the entire viewport and works best for one focal point. - Combine
pulse: truewith short highlights to draw the eye to transient output. - Use
track_scroll: truewhen highlighting text that may scroll off-screen during the highlight’s duration.
Highlights are your most expressive tool for directing the viewer’s eye. Used judiciously, they turn a passive recording into an active guided tour of the terminal output.
Importing Existing Recordings
Already have terminal recordings from asciinema? Import them:
# From asciinema (.cast files)
great-docs termshow import-cast recording.cast assets/my-demo
The import preserves timing and terminal dimensions. Create a .termshow.yml script afterward to add chapters and annotations.
The importer produces the same .termshow format, so all editing and rendering features work identically regardless of the original source.
Rendering & Preview
You can preview and render recordings outside of a full site build using these CLI commands:
Preview in terminal
great-docs termshow play assets/my-demo.termshowPlays the recording directly in your terminal for quick review.
Render SVG frames manually
great-docs termshow render assets/my-demo.termshowGenerates the SVG keyframes and manifest.json without a full site build. Useful for inspecting the output or debugging chapter timing.
Both commands work with any .termshow file that has a companion .termshow.yml script.
Best Practices
These guidelines help produce recordings that are clear, fast-loading, and pleasant to watch:
- Keep recordings short: 15–30 seconds is ideal. Split longer workflows into multiple recordings, each embedded with its own shortcode.
- Use cuts to trim dead time: Mark boring pauses (downloads, progress bars) as cuts so viewers skip them entirely.
- 80 columns, 20 rows works well for CLI demos. Use 120 columns for wide output like log lines or tables. The Termshow Editor auto-scales the preview to fit any terminal size, so larger dimensions won’t overflow the viewport.
- Test at different speeds: Make sure annotations are readable at 1.5× and 2×.
- Place recordings in
assets/: Keep them in a dedicated directory at your project root. The build system discovers them automatically.
Following these guidelines ensures your recordings feel polished and load quickly, even on slower connections.
How It Works
The Termshow pipeline has two phases:
Build time (automatic during great-docs build):
- Discovers all
.termshowfiles in the project root - Parses each recording + its YAML script
- Renders SVG keyframes at each visual change point
- Generates
manifest.jsonwith timing, chapters, and annotations - The Quarto shortcode filter embeds the manifest and all SVGs inline as JSON
Page load (JavaScript, no network requests):
- Reads inline manifest and SVG data from embedded
<script>elements - Builds the player UI (viewport, controls, chapter bar, overlays)
- On play: advances time via
requestAnimationFrame, swaps SVG frames at correct timestamps
This architecture means zero runtime fetches, full offline support (including file:// protocol), and pixel-perfect SVG rendering at any zoom level.
The Termshow Editor
The Termshow Editor is a browser-based non-linear editor (NLE) for .termshow recordings. It lets you visually add, move, and fine-tune chapters, annotations, and cuts without editing YAML by hand.
Launching the Termshow Editor
great-docs termshow edit assets/my-demo.termshowThis opens a local web app at http://127.0.0.1:8765. The Termshow Editor loads the recording and its companion .termshow.yml script file (creating one if it doesn’t exist). Use --port to change the port or --no-browser to suppress the automatic browser launch.
Interface Layout
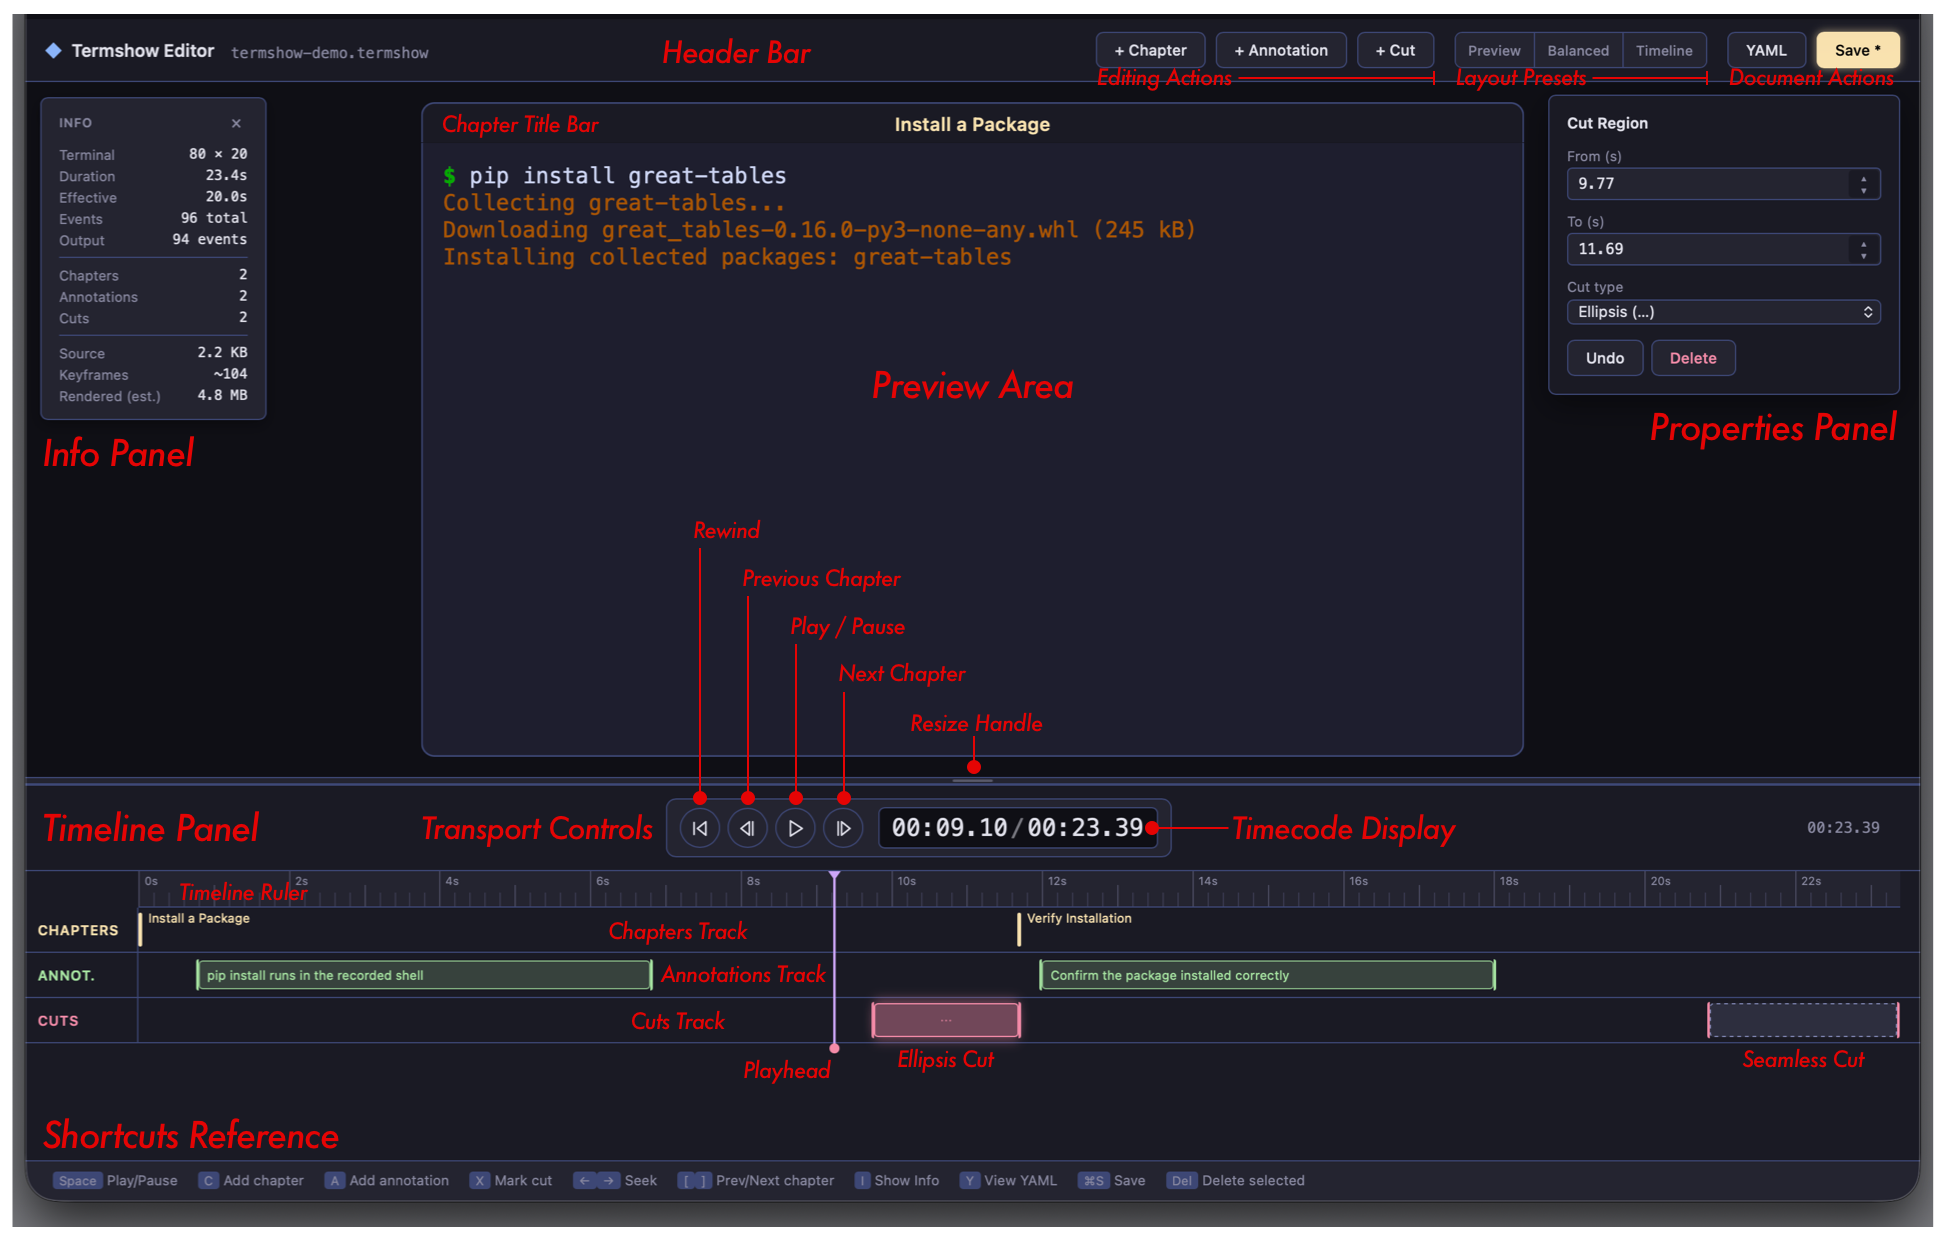
The Termshow Editor is divided into these primary areas:
Header Bar. The top bar shows the editor title and filename, along with action buttons organized into thematic groups:
Editing actions (left):
- + Chapter: add a chapter marker at the current playhead position (shortcut: C)
- + Annotation: add a 2-second annotation at the playhead (shortcut: A)
- + Cut: mark a cut region at the playhead (shortcut: X)
- + Snippet: add a snippet at the playhead (shortcut: D)
- + Highlight: add a highlight at the playhead (shortcut: H)
Layout presets (center): A segmented button with three view presets that control the split between the Preview Area and the Timeline Panel:
- Preview: 75/25 split: maximizes the terminal view for inspecting output
- Balanced: 50/50 split: equal space for preview and timeline (default)
- Timeline: 25/75 split: maximizes the timeline for detailed editing
Document actions (right):
- YAML: View the generated YAML script (shortcut: Y)
- ▶ Preview: Open the production preview modal (shortcut: P)
- Save: Write changes to the
.termshow.ymlfile (shortcut: Cmd+S / Ctrl+S). Pulses gold when there are unsaved changes.
Preview Area. The center panel shows a live terminal preview. It renders the recording state at the current playhead position, updating in real time as you scrub, drag edges, or play back.
The viewport uses auto-fit scaling: the terminal always renders at its native character grid (matching the recorded dimensions), then scales proportionally to fill the available space. This means wide recordings (120 columns) and tall recordings (40+ rows) display without clipping or scrollbars. When you expand the preview area (via the resize handle or layout presets), the terminal scales up to fill it. The scaling recalculates on window resize and during drag.
Above the terminal viewport, a Chapter Title Bar displays the currently active chapter name, simulating the window chrome appearance of the final player.
Settings Button: A small circular gear (⚙) button sits in the top-left corner of the Preview Area, next to the Info Button. Clicking it (or pressing G) toggles the Settings Panel described above.
Info Button: A small circular i button sits in the top-left corner of the Preview Area. Clicking it (or pressing I) toggles the Info Panel, a floating overlay showing recording metadata:
- terminal dimensions (cols × rows)
- duration (effective, accounting for cuts; raw duration shown in parentheses when cuts exist)
- event count (total and output events)
- chapter, annotation, and cut counts
- source file size
- estimated keyframe count and rendered SVG size
The Info Panel updates live as you add or remove items. Click the × in its top-right corner or press I again to dismiss it.
Resize Handle. A draggable divider between the Preview Area and the Transport/Timeline section. Drag it down to enlarge the terminal preview (the terminal scales up to fill), or drag it up to give more space to the timeline tracks. The preview area has a minimum height of 150px, and the timeline area is clamped so all three tracks remain visible. Manually dragging clears the active layout preset indicator.
Transport Controls. Below the resize handle, centered transport controls provide:
- Rewind (⏮): Jump to the start of the recording
- Previous Chapter (⏴): Jump to the previous chapter marker (shortcut:
[) - Play/Pause (▶/⏸): Toggle playback (shortcut: Space)
- Next Chapter (⏵): Jump to the next chapter marker (shortcut:
]) - Timecode Display: Shows elapsed time / total duration in
MM:SS.ccprecision. Click the current-time value to type an exact position (e.g.,01:23.45) and press Enter to jump there.
Timeline Panel. The bottom panel contains five track lanes beneath a Timeline Ruler, the graduated strip showing time markings. Click anywhere on the ruler to reposition the playhead instantly, or drag the playhead indicator to scrub through the recording. The ruler is the safest place to navigate without accidentally selecting or creating items.
Chapters Track: Gold vertical markers. Click a marker to select it; drag to reposition. Double-click empty space to add a new chapter with placeholder text.
Annotations Track: Green boxes spanning their time duration. The annotation text is shown inside each box (clipped if too long). Click a box to select it; drag to reposition. Boxes have left and right edge handles for resizing. Double-click empty space to add a 2-second placeholder; drag across the track to create a custom-duration annotation.
Cuts Track: Red (ellipsis) or purple-dashed (seamless) blocks. A centered
⋯symbol distinguishes ellipsis cuts. Click a box to select it; drag to reposition. Boxes have edge handles. Double-click empty space to add a 2-second cut; drag across the track to create a custom-length cut.Snippets Track: Blue boxes showing the snippet text. Click a box to select it; drag to reposition. Boxes have edge handles for resizing the time range. Double-click empty space to add a 5-second placeholder; drag across the track to create a custom-duration snippet.
Highlights Track: Color-coded boxes styled per highlight type (cyan for box, green for underline, yellow for background, orange for spotlight, pink for badge). Click a box to select it; drag to reposition. Boxes have edge handles for resizing. Double-click empty space to add a 3-second highlight; drag across the track to create a custom-duration highlight. Unlike snippets, highlights may overlap in time (multiple highlights can be active simultaneously).
A Playhead (white vertical line) spans all five tracks and moves with the current time.
Global Settings Panel
The Termshow Editor includes a Global Settings panel for configuring global script settings visually. Click the gear icon (⚙) in the top-left corner of the Preview Area or press G to toggle it.
The Settings panel exposes the following controls:
| Control | Description |
|---|---|
| Default speed | Playback speed multiplier (dropdown: 0.5×, 1×, 1.5×, 2×, 3×) |
| Chrome | Window decoration style (dropdown: colorful, simple, none) |
| Font family | Comma-separated font stack for rendered output |
| Prompt | Replacement character for prompt substitution, with preset buttons |
| Pattern | Regex pattern for prompt detection (see Prompt Substitution) |
All changes apply immediately to the live preview so you can see the effect of each setting in real time. Settings are saved to the settings block of the .termshow.yml file when you press Save.
Press Escape or click outside the panel to dismiss it.
Properties Panel
Clicking any item in the timeline opens the Properties Panel on the right side. The panel adapts to show fields relevant to the selected item type, and all edits are live: changes apply immediately as you type, with no Apply button needed.
For chapters, the panel shows the timestamp and label text. Annotations add duration, the annotation body, and dropdowns for position, width, and style. Cut regions expose the start and end times along with the cut type (jump or ellipsis). Snippets include the time range, literal copy text or regex match pattern, and a label for the button.
Highlights have the richest panel: in addition to timing and style, you can configure the target (a fixed region, regex pattern, or line list), color and opacity, fade transitions, pulse animation, and badge-specific options like label text and placement.
Every panel also includes an Undo button (which reverts the item to its state when the panel opened) and a Delete button to remove the item entirely. Because changes are live, you can watch the terminal preview update as you adjust values.
Edge Editing
Annotation boxes, cut regions, snippet boxes, and highlight boxes all have draggable edge handles (left and right). When you grab an edge:
- The playhead snaps to that edge’s time position, showing the exact terminal frame at the boundary.
- The edge displays a prominent vertical stem extending beyond the track (green for annotations, red for cuts, blue for snippets, style-colored for highlights) with a directional glow so you know which side is active.
- Arrow keys (← →) nudge the active edge by ±10ms for frame-accurate positioning. The playhead tracks the edge so you can see the terminal state update with each nudge.
Clicking elsewhere or pressing Escape deselects and restores normal edge appearance.
Drag-to-Create
On the Annotations, Cuts, Snippets, and Highlights tracks, clicking and dragging across empty space creates a new item spanning the drag distance. The drag only initiates after a 4-pixel movement threshold, preventing accidental creation from stray clicks. If you want a fixed-size item without dragging, double-click instead (creates a 2-second item for annotations/cuts, 5-second for snippets, or 3-second for highlights).
Cut Types
The two cut types have distinct visual appearances in the timeline:
| Type | Appearance | Playback Effect |
|---|---|---|
| Seamless | Purple dashed block (no symbol) | Silent jump with no visual indicator |
| Ellipsis | Solid red block with ⋯ symbol |
Shows a 1 second “⋯” overlay during playback |
Switch between types using the “Replace With” dropdown in the properties panel.
Keyboard Shortcuts
The Termshow Editor supports these keyboard shortcuts for efficient editing:
| Key | Action |
|---|---|
Space |
Play / Pause |
C |
Add chapter at playhead |
A |
Add annotation at playhead |
X |
Add cut at playhead |
D |
Add snippet at playhead |
H |
Add highlight at playhead |
G |
Toggle global settings panel |
I |
Toggle info panel |
| ← / → | Seek ±1 second (or nudge active edge ±10ms) |
[ / ] |
Jump to previous / next chapter |
Y |
View YAML |
P |
Preview |
| Delete / Backspace | Delete selected item |
Escape |
Close settings/properties panel, deselect |
| Cmd+S / Ctrl+S | Save |
Unsaved Changes
Any modification (adding, moving, editing, or deleting items) marks the session as dirty. The Save button changes to Save* with a pulsing gold glow to indicate unsaved changes. Saving resets the indicator.
Preview
The Preview button (shortcut: P) opens a full-screen modal showing your recording exactly as it will appear on a built site. Unlike the in-editor live preview (which shows the raw SVG frame at the current playhead), the Preview modal renders the complete player using Quarto with the production termshow shortcode, embedded fonts, dark theme, and autoplay enabled.
This lets you verify the final presentation (including the control bar, chapter markers, speed controls, and annotations) without running a full site build.
The modal provides three tabbed viewports at fixed widths:
| Tab | Viewport Width | Use Case |
|---|---|---|
| Desktop | 900px | Standard laptop/desktop browser |
| Tablet | 600px | Tablet or narrow browser window |
| Mobile | 375px | Phone-sized viewport |
Switch between tabs to verify that the player renders well at each breakpoint. The player is fully interactive within each viewport: you can play, pause, seek, and test chapter navigation.
The preview is generated on-demand by rendering a temporary page that is fully self-contained with no external dependencies. Generation takes a few seconds and a loading indicator is shown while the render completes.
Press Escape or click outside the modal to close it.
Recommended Workflow
Record the terminal session into
assets/withgreat-docs termshow record assets/demo.termshow. This creates a paired set of files:assets/demo.termshow: the raw recording (timing + terminal output)assets/demo.termshow.yml: the script file (chapters, annotations, cuts, settings)
Both files are always required. The
termshow recordcommand creates both automatically. The.ymlfile is generated with commented template sections you can uncomment and fill in. Theassets/directory is recommended because it is automatically available to theshortcode at build time.Open the Termshow Editor with
great-docs termshow edit assets/demo.termshowto visually edit the script.Play through once to get familiar with the recording’s content and timing. Click the Timeline Ruler (the graduated strip above the tracks) to scrub to any point.
Add chapters at logical transitions: double-click the Chapters Track or press C at each transition point.
Add annotations to explain key moments: drag across the Annotations Track to set the exact duration, or double-click for a 2-second default. Edit the text in the Properties Panel.
Mark cuts to remove dead time: drag across the Cuts Track to select the boring parts. Use “ellipsis” for long skips (so viewers know time was removed) and “seamless” for short gaps (smooth editing).
Fine-tune edges: click an edge handle, then use arrow keys to nudge it frame-by-frame while watching the terminal preview update.
Preview: press P to open the production preview and verify the final player at desktop, tablet, and mobile widths.
Save and embed in a page with the
shortcode.
The Termshow Editor saves only to the .termshow.yml script file. The raw recording is never modified, so you can always start fresh by deleting the script and re-editing.
Next Steps
Terminal recordings bring CLI workflows to life with crisp, interactive playback directly in your documentation. Combined with chapters and annotations, they replace static code blocks with guided, self-paced walkthroughs that readers can pause and study.
- Videos: embed video content for non-terminal demos and walkthroughs
- CLI Documentation: auto-generate reference pages for the commands you record
- Diagrams: complement terminal demos with architecture and flow visualizations
- Theming: customize player colors and appearance to match your site
- Building: how Termshow shortcodes fit into the Quarto build pipeline