
Suppose you’ve written a guide to a web app, and you want a short video that shows how to add a task. Doing it by hand means clicking through the app with a screen recorder running, trimming the result, and doing it all again whenever the app changes.
With paparazzi, you write the steps down in R instead. paparazzi runs them in a real browser and records the video, gliding the cursor to each control, typing one character at a time, and zooming the camera in on what matters.
In this article, we’ll build this video one step at a time:
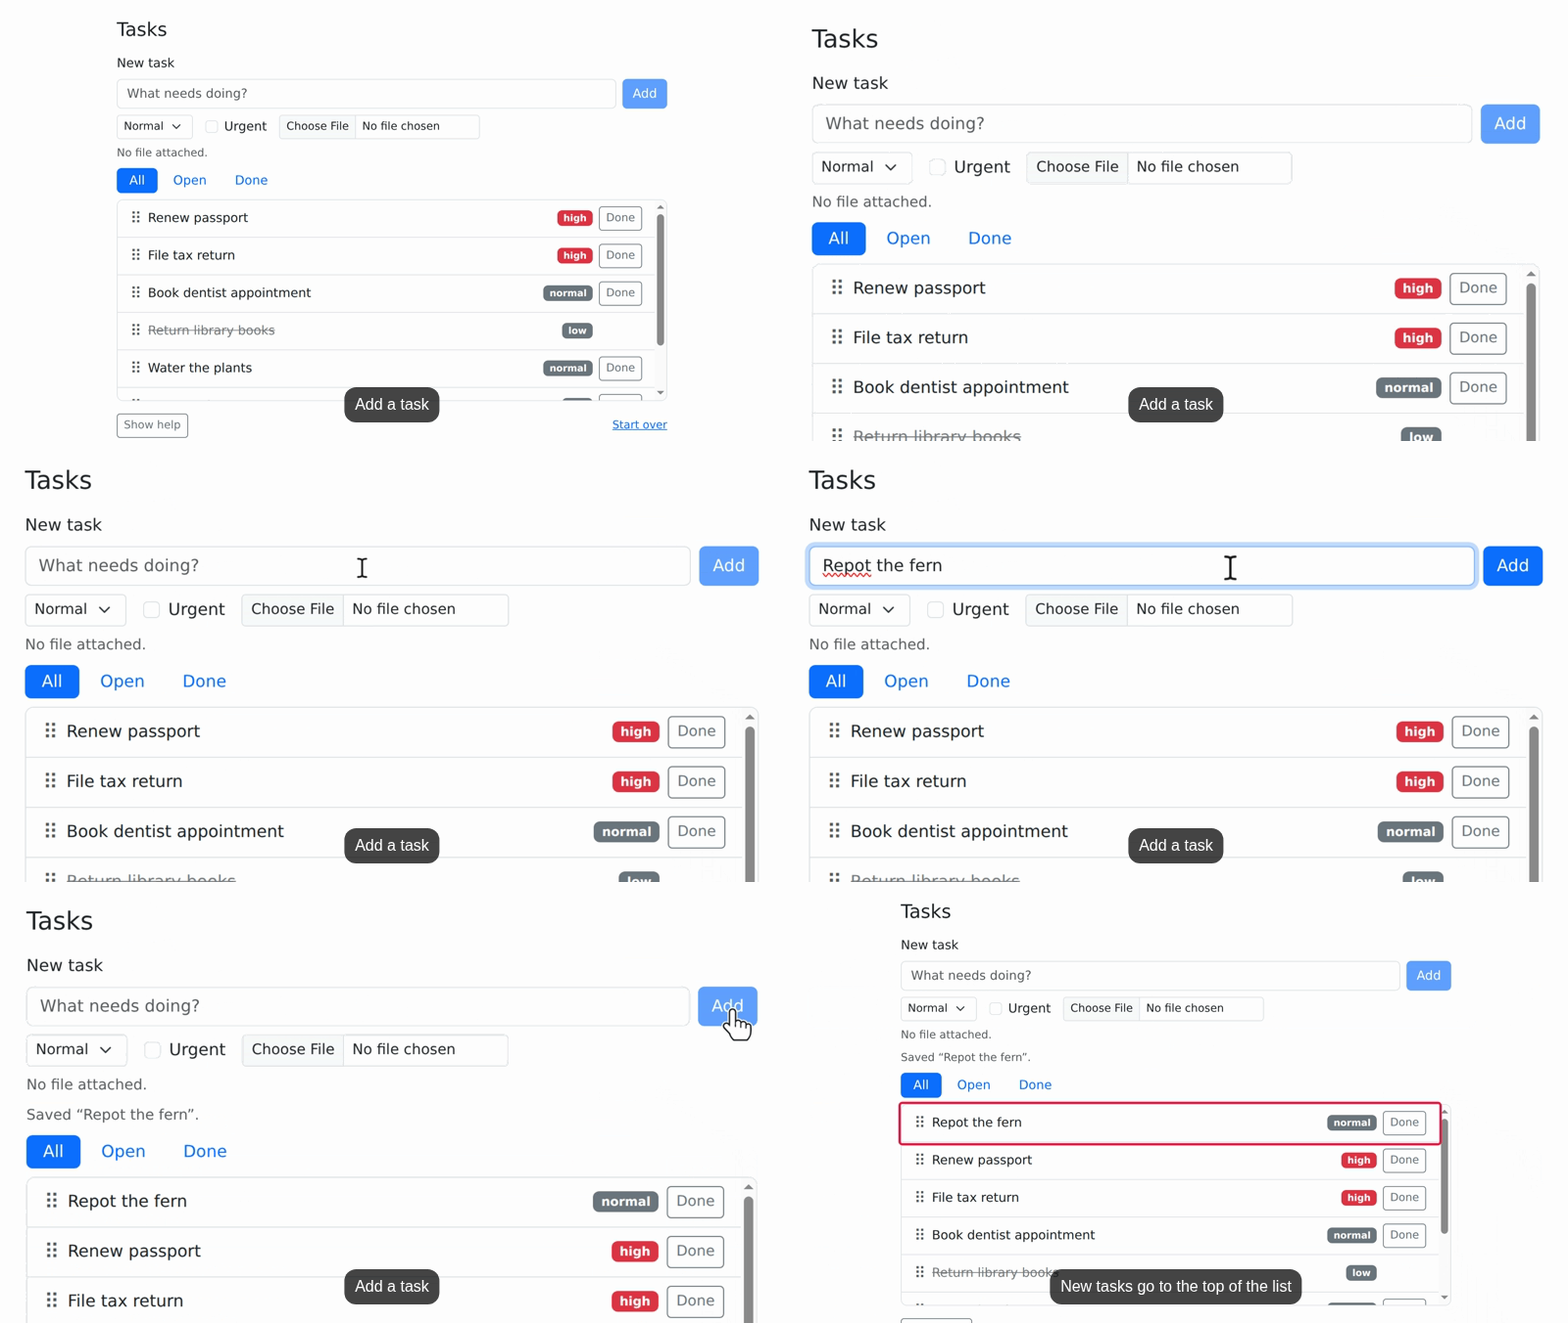
We’ll use a small task-tracker page that ships with paparazzi. First we’ll open it and take a screenshot. Then we’ll script the steps, record them, and add the camera moves, highlight, and captions. At the end, we’ll see how the same script works as a test.
You’ll need Chrome or another Chromium-based browser, which paparazzi controls through the chromote package. The GIFs in this article need the gifski and png packages, and av for the captions.
Open a page
pz_open() starts a headless browser and loads a page. It
takes a URL, a local HTML file, a directory of static
files, a Shiny app,
or a Quarto document or
project. pz_example() returns the path to the examples
that come with paparazzi, so we’ll use that to open the task tracker
example:
page <- pz_open(
  pz_example("tasks"),
  width = 1000,
  height = 720,
  color_scheme = "light"
)
page
#> ── paparazzi page ──────────────────────────────────────────────────────────────
#> URL        http://127.0.0.1:4023/tasks.html
#> Device     1000 × 720 @2x · light
#> Recording  off · cursor hidden
Printing the page tells you about the browser, its settings, and the
page. Here, the browser has a 1000 by 720 pixel viewport at twice the
usual pixel density, like a laptop’s high-resolution screen, with the
page’s light color scheme. These are device settings.
They decide what the page looks like, so they also decide what your
screenshots and videos look like. You can change them later with
pz_device().
pz_screenshot() shows us the page:
page |> pz_screenshot()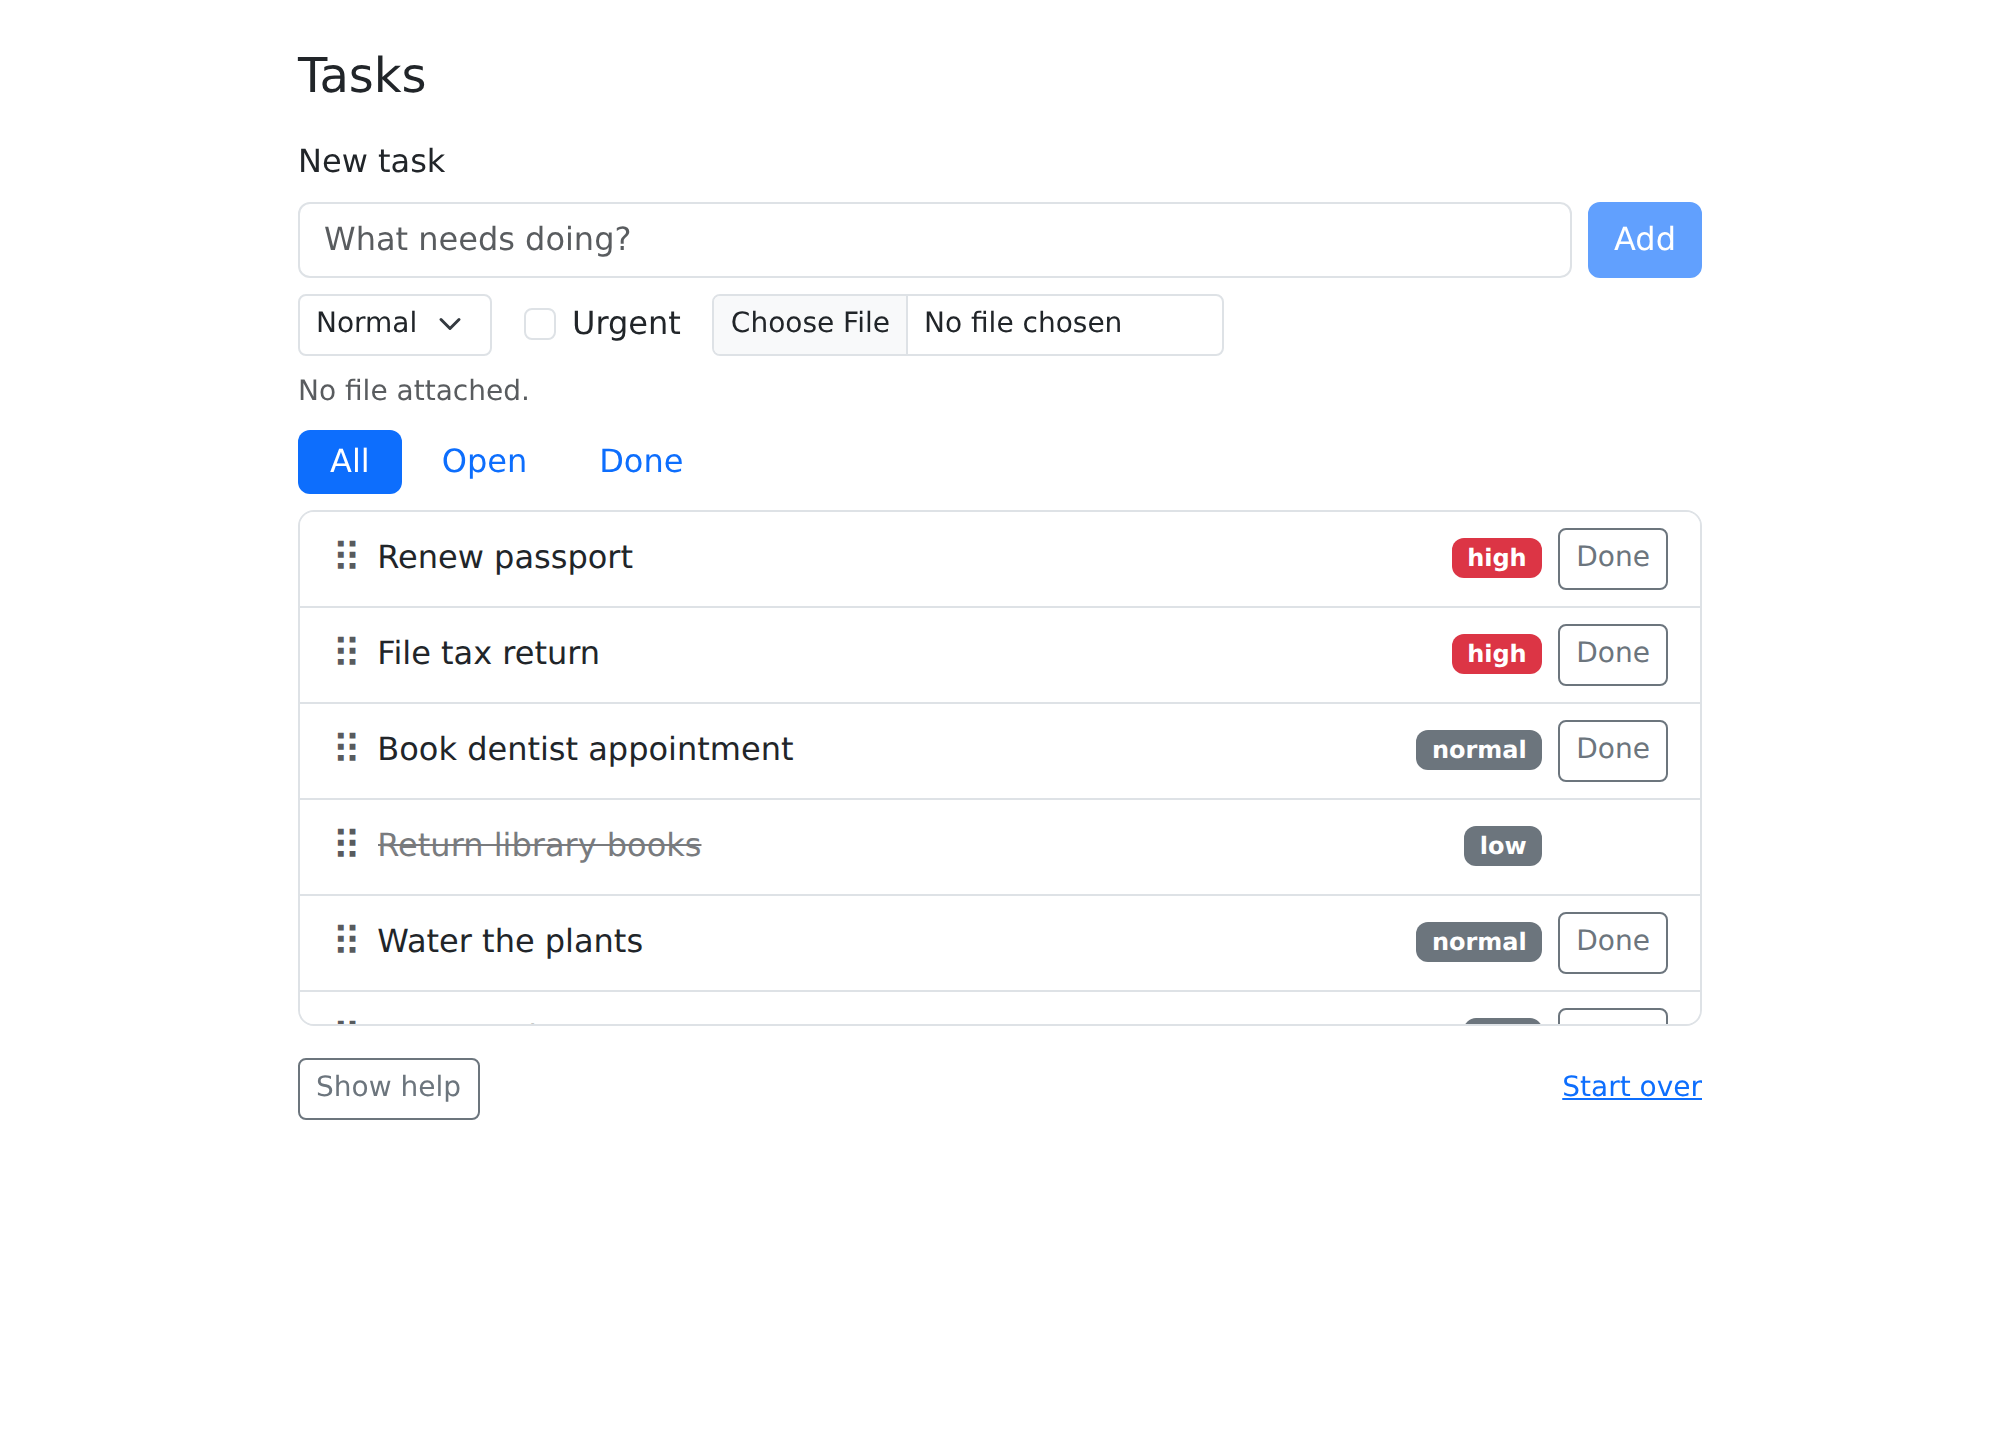
When you end a knitted chunk with a screenshot and no file path, the
screenshot appears as a figure in the document, as above. Interactively,
in the Positron or RStudio R
console, paparazzi opens it in the viewer. Give it a path
to save a file instead.
Script the steps
To add a task, a person using the task tracker would type a title
into the form and click Add. Our script does the same, but it has to
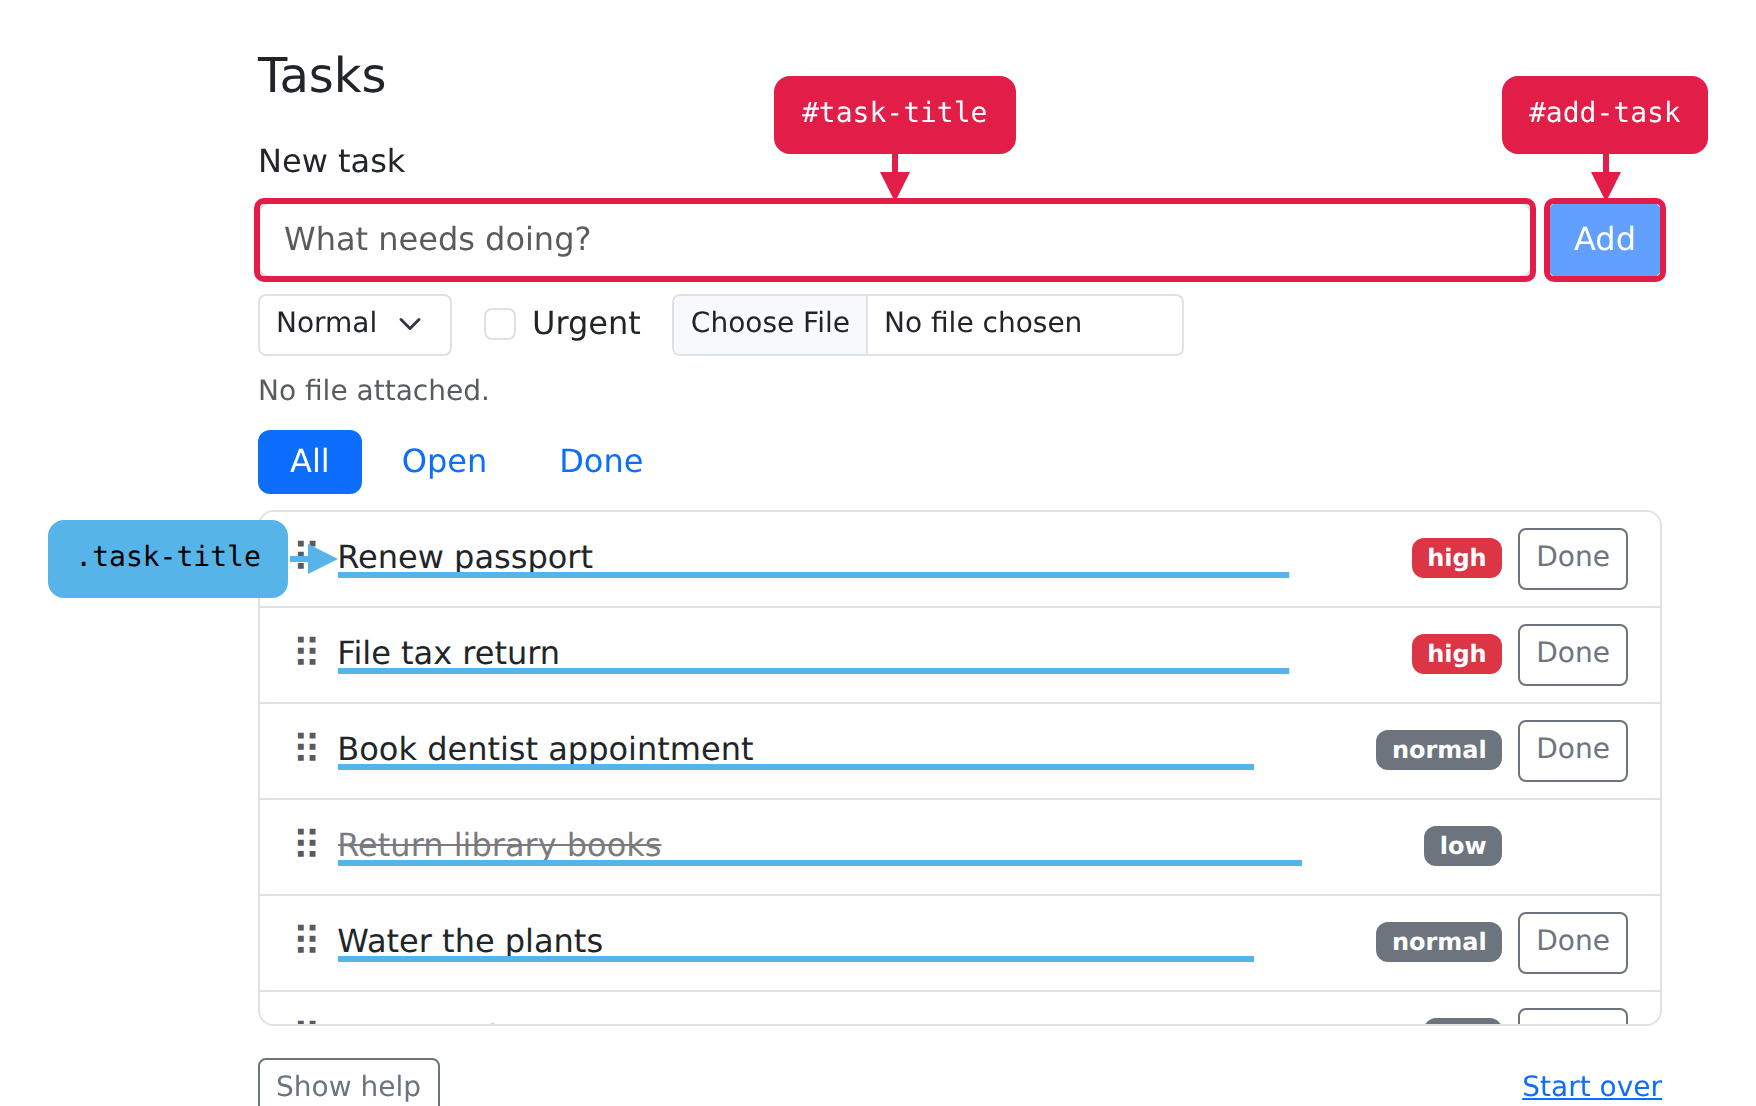
tell paparazzi which elements to use. paparazzi finds elements with CSS
selectors: the title field is #task-title, the Add button
is #add-task, and each task in the list shows its title in
a .task-title element.
Actions like pz_act_type() and
pz_act_click() use the page the way a person using it
would, with real mouse and keyboard events. Each action takes the page
first and returns it, so a script reads as one chain of steps joined by
|>. Let’s add a new task, Repot the
fern, by typing it into the title field and clicking Add:
page |>
  pz_act_type("Repot the fern", target = "#task-title") |>
  pz_act_click("#add-task")
Before an action clicks or types, paparazzi waits for its element to be ready: on the page, not hidden, and not covered by anything else. The element doesn’t need to be on screen yet: if it’s scrolled out of view, paparazzi scrolls to it, then clicks or types.
Let’s check that the new task arrived. Some elements are easy to
target: the page has only one #task-title input and one
#add-task button. But it has a .task-title for
every task, so we need a more expressive way to say which one we
want.
pz_loc() describes an element more precisely than a
selector alone, and it lets us define how to find an element once and
reuse it in several calls. New tasks go to the top of the list, so we’ll
get the first .task-title with which = "first"
and then use pz_get_text() to read that element’s text.
first_task_title <- pz_loc(".task-title", which = "first")
pz_get_text(page, target = first_task_title)
#> [1] "Renew passport"
That’s not what we added! We added a task to repot the fern, but
pz_get_text() found the old first task, “Renew
passport”. That’s because it takes a little bit of time for the app to
actually save our new task (if you’re using the app you’d see the page
show “Saving…” for a moment before the new task appears), but our
pz_get_text() runs immediately after the last action. When
it does, a .task-title element exists on the page – just
not the one we want.
To wait for the new task, we need an expectation.
Actions wait for the element they act on, but here we need to wait for
the app to add a new element to the page before we move on. Expectation
functions start with pz_expect_. Each one checks the page
and, if the check fails, tries again until it passes or times out.
Let’s try again, using pz_expect_text() to wait for the
repotting task to show up in the app as the first task before we read
it.
page |>
  pz_expect_text("Repot the fern", target = first_task_title) |>
  pz_get_text(target = first_task_title)
#> [1] "Repot the fern"
In a demo, expectations do two jobs.
- They keep the script in step with the page, so the next step doesn’t start before the page is ready.
- And they stop the script if the page doesn’t show what you expected, so you never publish a video of the wrong thing.
When an expectation times out, its error says what it was looking for and what it last saw:
page |>
  pz_expect_text("Walk the dog", target = first_task_title, timeout = 1)
#> Error in `pz_expect_text()`:
#> ! Expected text to contain "Walk the dog"
#> Target: `.task-title` (which: first)
#> Last seen: "Repot the fern"
#> Waited 1s.
paparazzi calls a pz_loc() description a
location spec. A spec doesn’t find anything when you
create it: paparazzi looks up the elements each time you use it, so one
spec keeps working as the page changes. That’s how
first_task_title found “Renew passport” the first time and
“Repot the fern” once the new task arrived. We’ll describe the new task
with a spec, too, and use it in the video:
fern <- pz_loc(".task", has_text = "Repot the fern")has_text picks .task elements whose text
includes “Repot the fern”. pz_loc() can also pick a match
by position with which, or look inside another element with
within.
Record it
To record a video, you have two choices:
-
Wrap the steps in
pz_record(). It starts recording, runs the code in braces, then stops and writes the file, even if the code throws an error. -
Start a chain with
pz_record_start()and end it withpz_record_stop(). In a script, this lets you record several videos in one long chain: give eachpz_record_start()its own path, and eachpz_record_stop()writes that file and passes the page along to the next step.
This article is an R Markdown document, so we’ll use
pz_record_start() and leave out both the path and
pz_record_stop(). When the recording chain ends the chunk,
paparazzi stops the recording and adds it to the document.
pz_record() works the same way in a document: leave out the
path, name the code argument, and the recording appears
where the chunk is. In an interactive session, both show the recording
in the viewer instead.
We’ll reload the page to start fresh, and ask for a GIF, which plays
by itself on a web page. scale = 800 makes it 800 pixels
wide:
page |> pz_nav_reload()

page |>
  pz_record_start(format = "gif", scale = 800) |>
  pz_act_type("Repot the fern", target = "#task-title") |>
  pz_act_click("#add-task") |>
  pz_expect_visible(fern)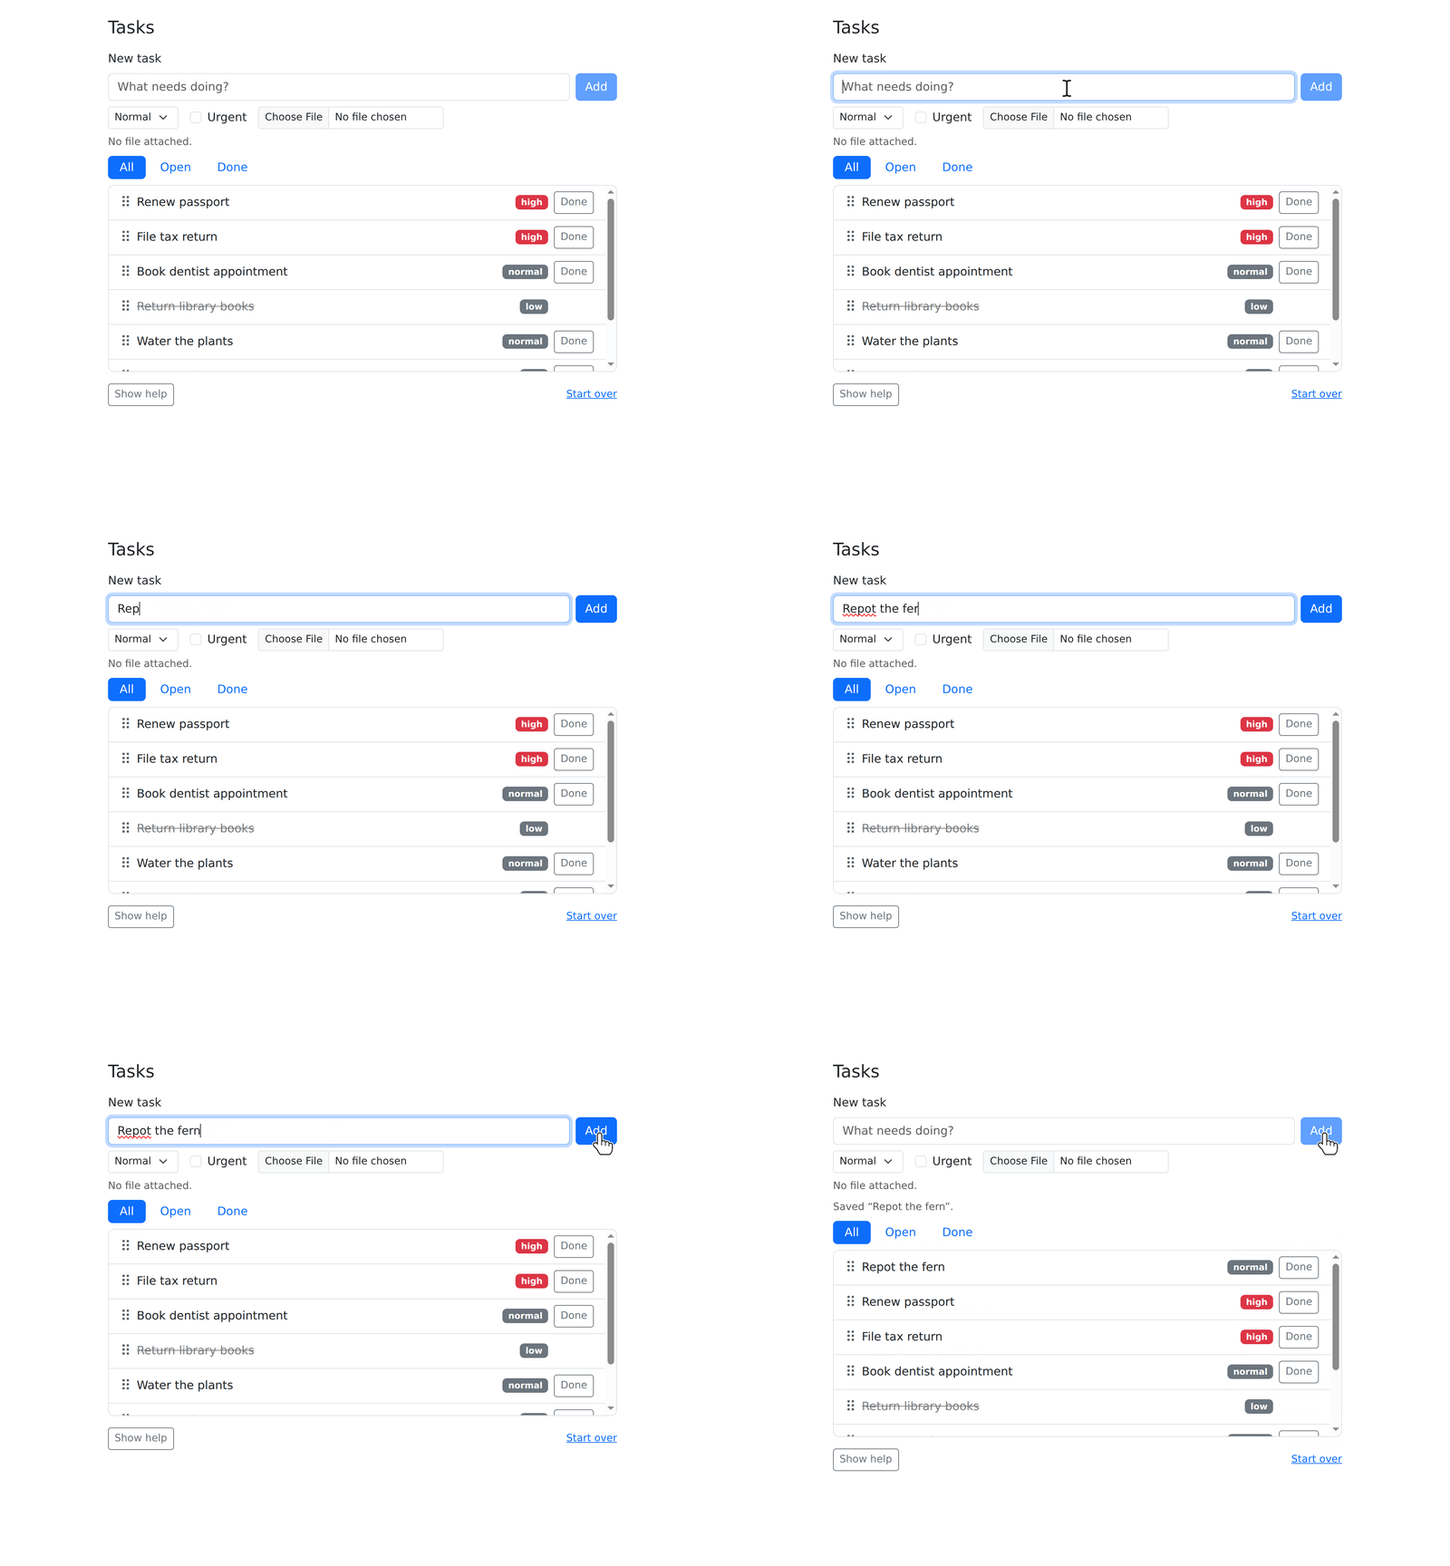
The steps are the ones we ran before, but in the recording it looks as though a real person is using the task tracker. The cursor fades in over the title field and fades out while it types, so it doesn’t cover the text. Then it glides to the Add button and presses it.
paparazzi calls these animations staging: the cursor moving between elements, paparazzi typing one character at a time, and the pauses between steps. paparazzi stages steps only while it records. When we ran the same steps earlier, outside a recording, paparazzi skipped the animations and ran them at full speed.
pz_stage() changes how paparazzi stages steps. It can
set where the cursor enters, how fast it moves, how big it is, how fast
paparazzi types, and how long to pause after each step. Some functions
also take a setting for a single step, like duration in
pz_cursor_move() or effect in
pz_act_click(), for complete control. But
pz_stage() is the best way to set them once for every
step.
Staged settings belong to the chain, not the page.
pz_stage() hands them to the next step, and each step
passes them on; a new chain from page starts from the
defaults again. To keep the same settings for every chain, assign the
staged page and start each chain from it. For the final video, the
cursor will glide in from the bottom of the frame, and each step will
pause for 0.3 seconds so we don’t lose our viewers between steps:
page <- page |> pz_stage(enter = "bottom", pause = 0.3)Frame the shot
The recording above shows the whole viewport, with empty space around
the card. A frame crops a screenshot or recording to
part of the page. pz_frame() describes one: the elements to
fit, the padding around them, and optionally an aspect ratio.
We’ll use pz_frame() fit the card’s heading and task
list, pad them by 24 pixels, and widen the result to 16:9, the shape of
most video players and slides:
Like a spec, a frame is only a description. paparazzi measures the page when it uses the frame. A screenshot is a quick way to check one before recording:
page |> pz_screenshot(frame = shot)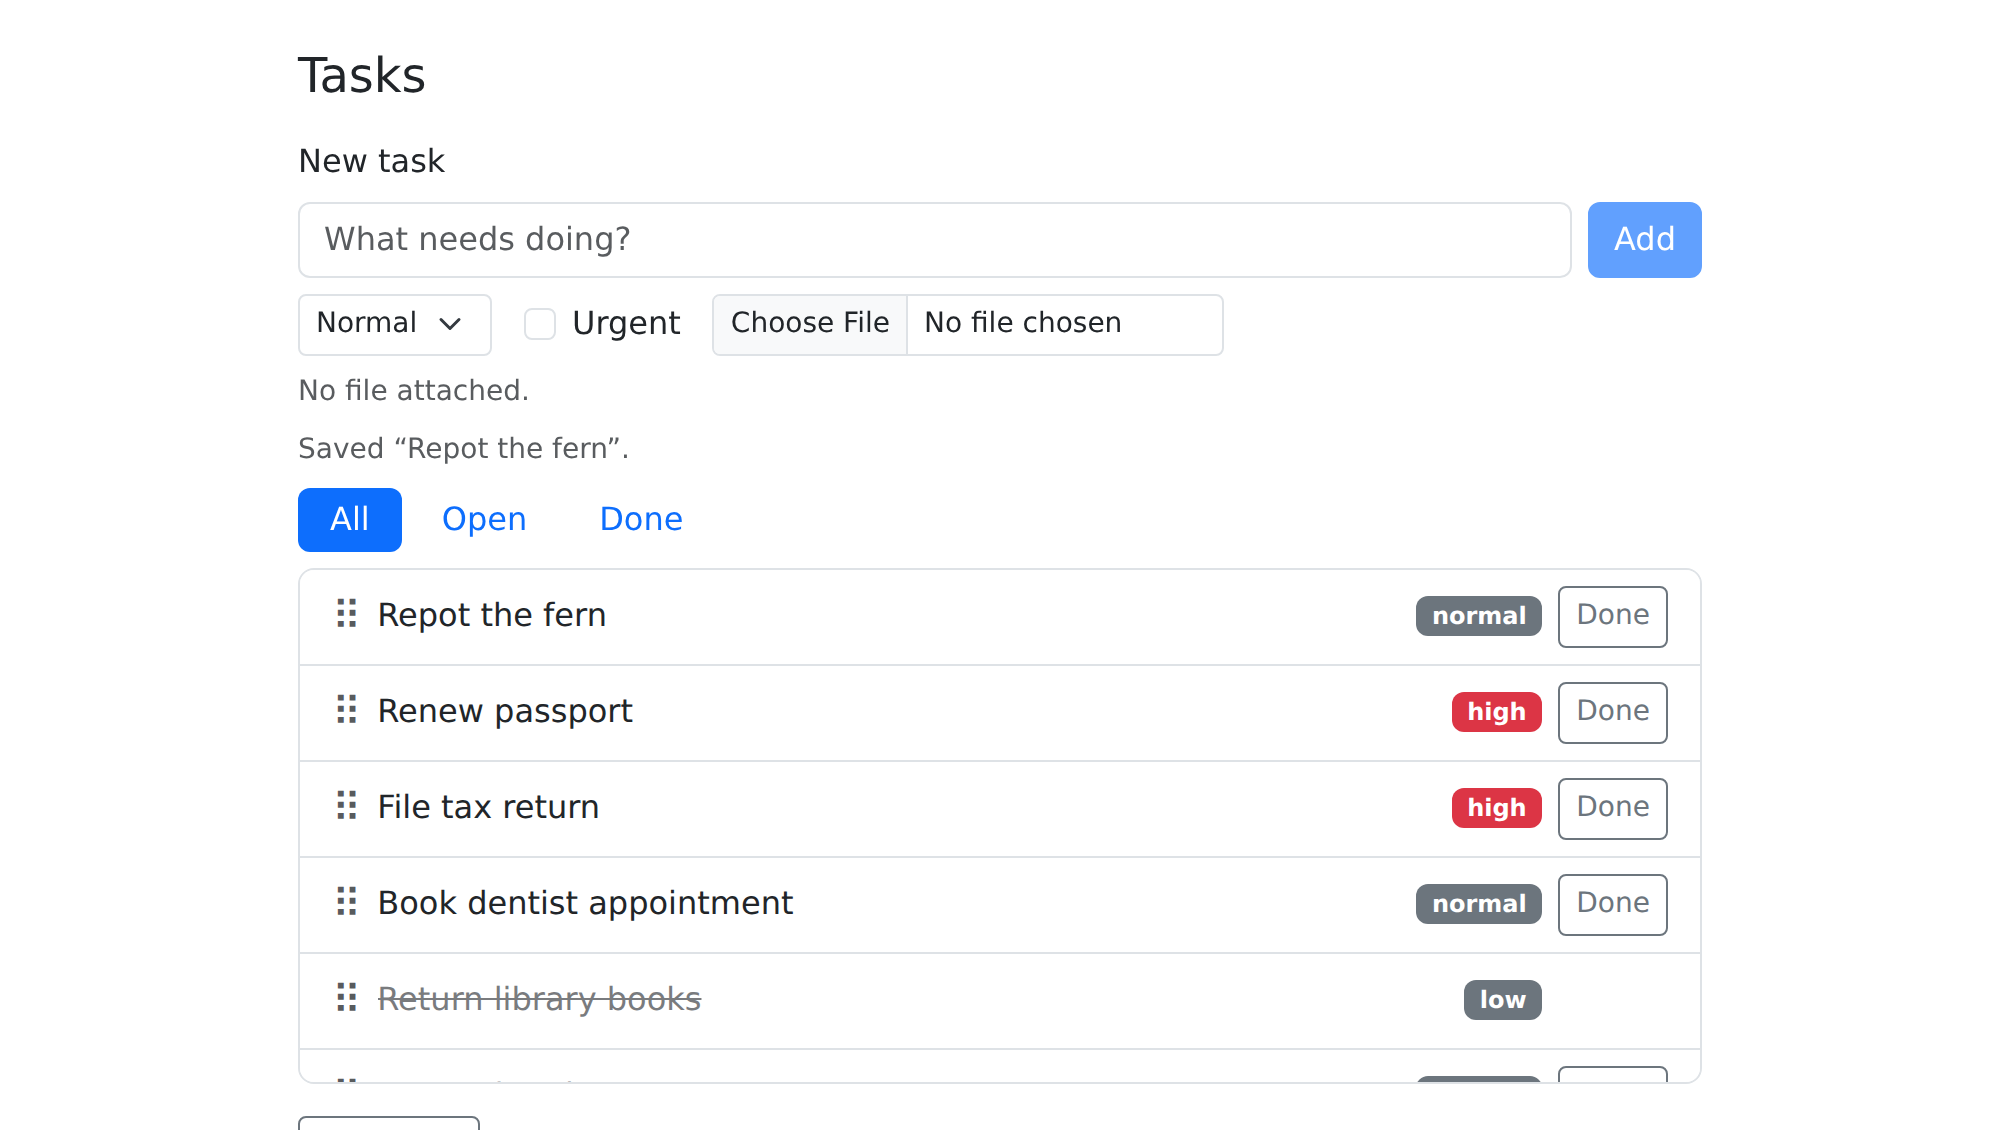
A frame can also leave out padding or set it separately for each
side. See pz_frame() for how to anchor the content while
it’s widened, or keep the frame within another element.
Direct the viewer’s attention
A viewer watching the recording from the previous section has a lot to take in at once. They need to find the form, notice the title field, follow the cursor to the Add button, and then spot the new task when the app saves it. We can make that much easier by directing their attention to each piece in turn, so they can focus on one thing at a time and understand how the task tracker works.
The final video does that in three ways. The camera zooms in on the form while the cursor types and clicks, then pulls back to show the list. An outline marks the new task once it appears. And a caption at the bottom of the video says what’s happening at each step.
The camera is part of the video, not the page.
pz_camera() doesn’t scroll or zoom the browser, so the
steps act on the page exactly as they did before. Outside a recording,
it does nothing. Here’s the whole script:
page |> pz_nav_reload()

page |>
  pz_record(
    frame = shot,
    format = "gif",
    scale = 800,
    code = {
      page |>
        pz_annotate_caption("Add a task") |>
        pz_camera("#new-task", wait = TRUE) |>
        pz_act_type("Repot the fern", target = "#task-title") |>
        pz_act_click("#add-task") |>
        pz_camera_reset() |>
        pz_expect_visible(fern) |>
        pz_annotate(fern, type = "box", pad = 4) |>
        pz_annotate_caption("New tasks go to the top of the list") |>
        pz_cursor_leave() |>
        pz_record_hold(1.5)
    }
  )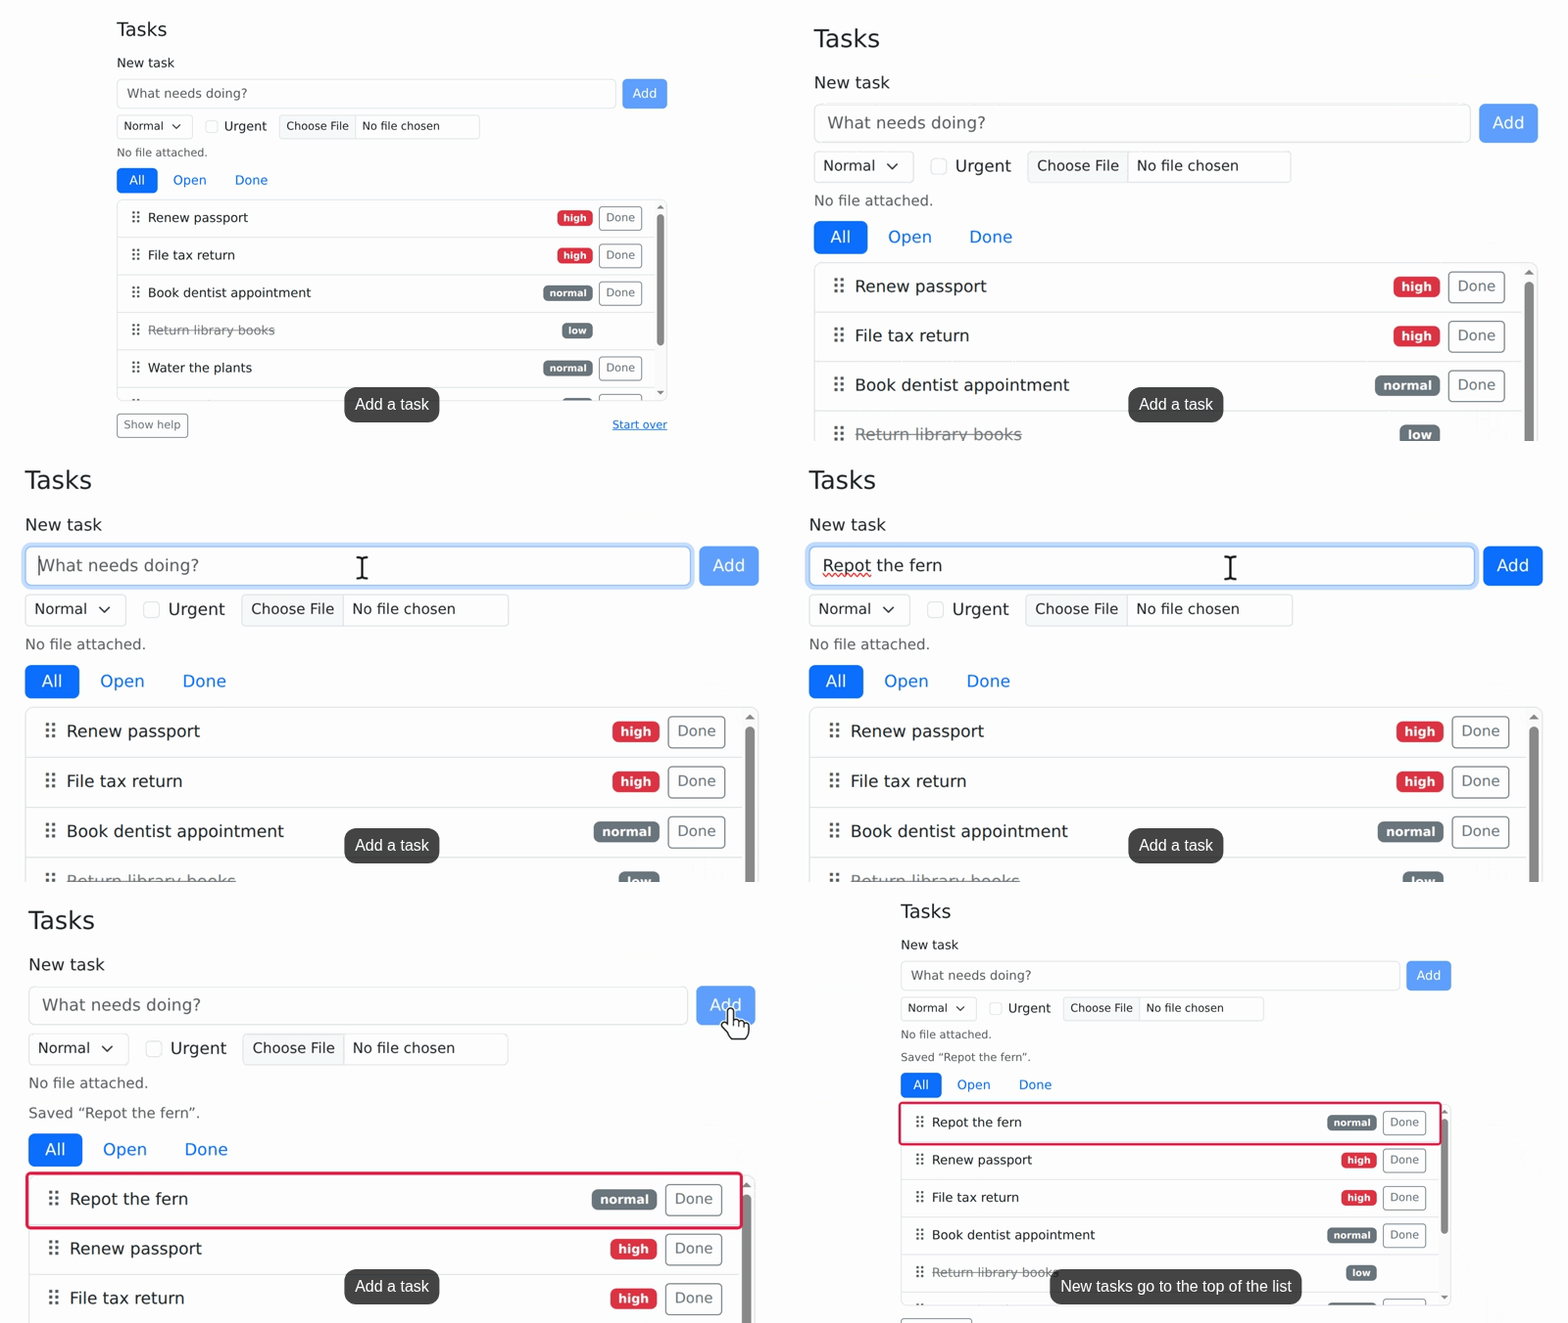
The new lines fall into three groups:
-
Camera.
pz_camera("#new-task")zooms in on the form. By default, camera moves run alongside the next step, so the camera and the cursor would move at the same time;wait = TRUElets the camera arrive first.pz_camera_reset()pulls back out to the whole frame. While it’s zoomed in, the camera also pans to keep each click and keystroke in view. -
Annotations.
pz_annotate_caption()sets the caption, and calling it again replaces the caption.pz_annotate()draws a box around the new task, afterpz_expect_visible()has waited for the task to exist. Annotations follow their elements as the page moves. -
Pacing.
pz_cursor_leave()moves the cursor out of the shot, so it doesn’t cover the result.pz_record_hold()holds the last frame for 1.5 seconds, so viewers have time to read the caption. paparazzi adds the hold to the video, not to the script, so outside a recording it doesn’t slow anything down.
Annotations stay on the page until you clear them, and they appear in screenshots too. Clear them before moving on:
page |> pz_annotate_clear()pz_annotate() can also draw circles, underlines, and
highlights, with numbered badges. pz_annotate_callout()
adds text with an arrow, pz_annotate_spotlight() dims
everything but one element, and pz_annotate_redact() covers
private information. The annotations
article shows them all.
Clicks can point the viewer too. By default, the cursor shrinks
briefly as it presses, which is hard to see in a small video, so
pz_act_click() can draw a ring instead, one that grows out
from the click point and fades. Here the cursor checks Urgent with the
default press, then unchecks it with effect = "ring":
page |>
  pz_record(
    format = "gif",
    scale = 800,
    frame = pz_frame("#new-task", pad = 8),
    code = {
      page |>
        pz_act_click("#task-urgent") |>
        pz_act_click("#task-urgent", effect = "ring")
    }
  )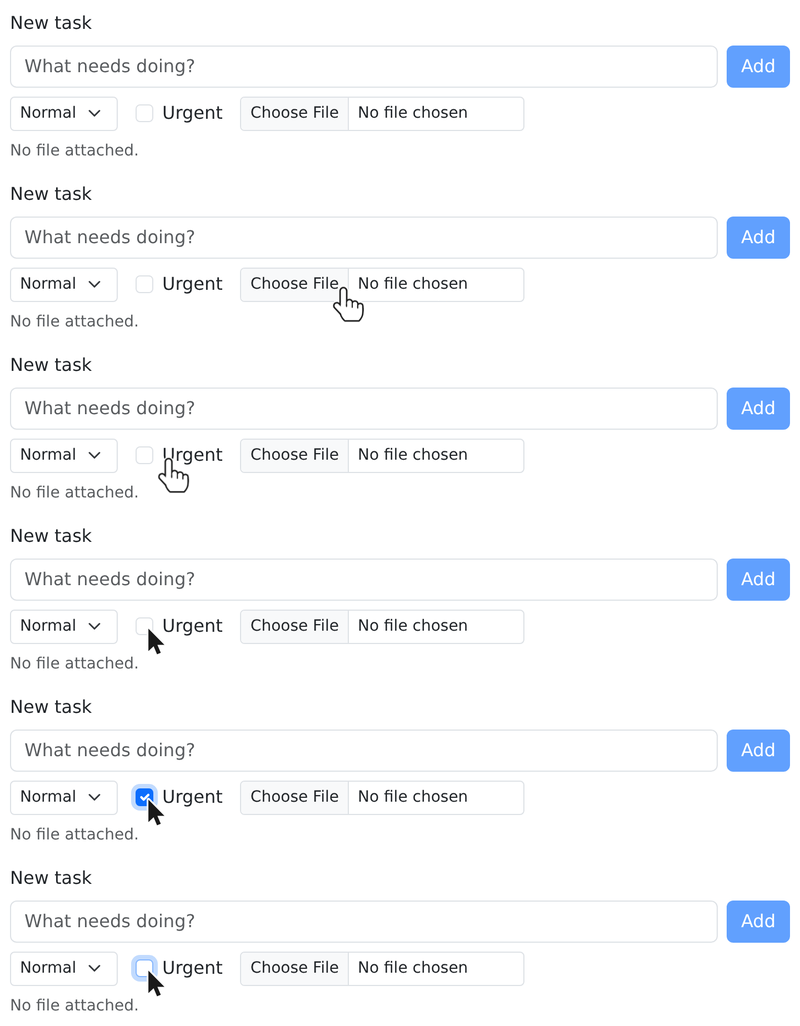
The ring is crimson unless you pass a CSS color as
effect_color, and effect = "none" turns click
feedback off. To change every click on the page, assign a staged page:
page <- page |> pz_stage(click_effect = "ring"), with
click_effect_color for the ring’s color.
Work in one part of the page
Every task in our list has its own Done button. To mark the fern
repotting done, the script needs to find its Done button.
pz_find() narrows the chain to one element, which paparazzi
calls the scope. After that, paparazzi looks up targets
inside the scope, so ".task-done" means this task’s Done
button:
page |>
  pz_find(fern) |>
  pz_act_click(".task-done") |>
  pz_expect_class("done")
With no target, pz_expect_class() checks
the scope element itself: the task.
The scope belongs to the chain, not to page.
pz_act_click() changed the browser tab, and every chain on
page will see the fern repotting marked done.
pz_find() doesn’t change anything in the browser. It
returns a new, scoped context, which goes down the chain, while
page still refers to the whole page. The next chain that
starts from page starts at the whole page again. To keep
working in a scope, assign it to a variable:
task_list <- pz_find(page, ".task-list")
task_list
#> ── paparazzi scope ─────────────────────────────────────────────────────────────
#> Scope      root › `.task-list` (1)
#> URL        http://127.0.0.1:4023/tasks.html
#> Device     1000 × 720 @2x · light
#> Recording  off · cursor hidden
Printing a scoped context shows the scope under a
paparazzi scope header. The Scope line reads from the whole
page (root) down to the task list, and (1)
says the scope holds one element. New chains from task_list
start inside it:
pz_get_count(task_list, target = ".task.done")
#> [1] 2
Two tasks are done: the fern repotting, and “Return library books”, which started out done.
Set up the browser
pz_device() changes the device settings on an open page,
so you can set up the browser exactly the way you want before you take a
screenshot or record. The task tracker follows the browser’s color
scheme, so here it is on a phone in dark mode:
page |>
  pz_device(width = 390, height = 700, mobile = TRUE, color_scheme = "dark") |>
  pz_screenshot()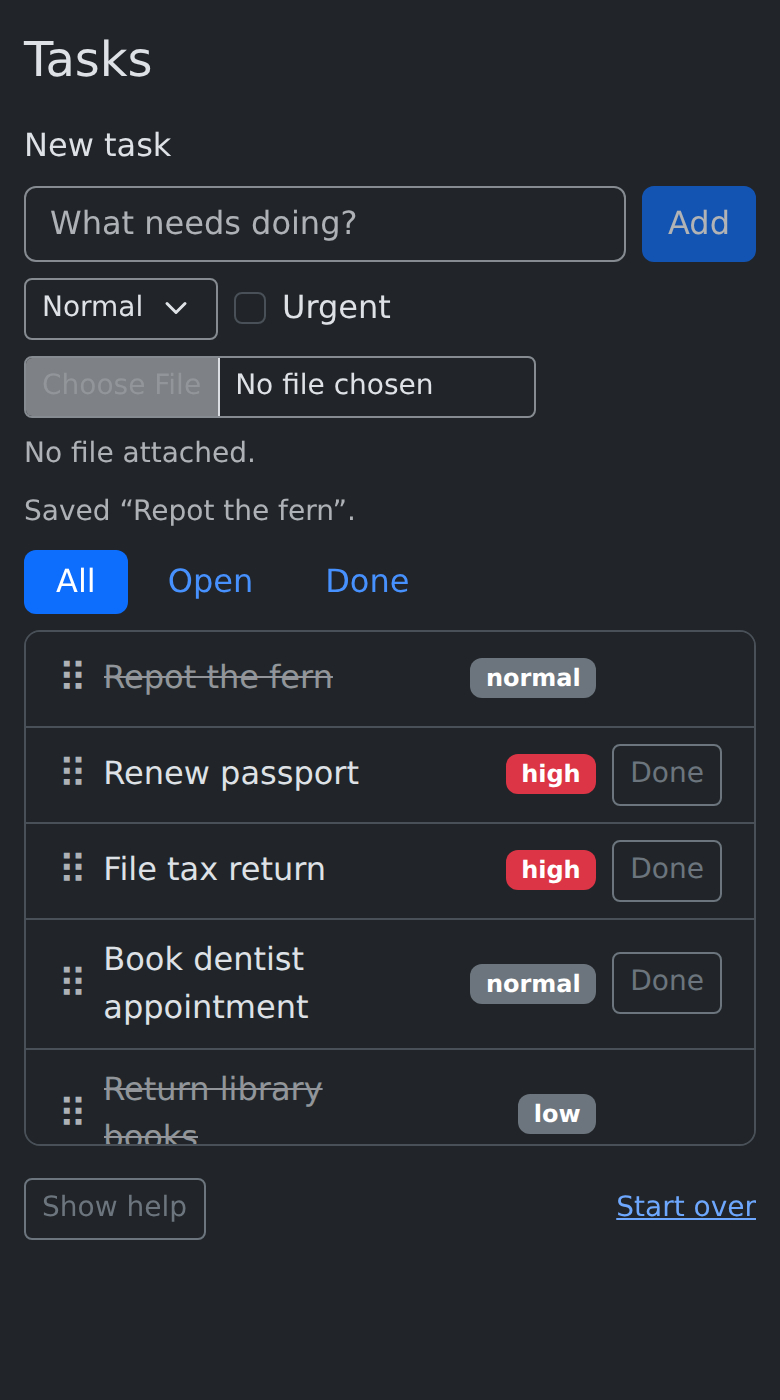
pz_device() can also zoom the page, turn on reduced
motion, or set the locale and time zone. Device settings stay in place
until you change them, so a recording made now would also be a phone
recording in dark mode.
When something goes wrong
When an action in your script can’t find its element, or finds the
wrong one, you can use pz_inspect() to see what paparazzi
sees. It prints the page summary and the matches for a target, which
paparazzi looks up from the current scope. Because it returns the
context it was given, you can drop it into the middle of a chain:
page |>
  pz_find(".task-list") |>
  pz_inspect(".task-done", show = "screenshot")
#> ── paparazzi scope ─────────────────────────────────────────────────────────────
#> Scope      root › `.task-list` (1)
#> URL        http://127.0.0.1:4023/tasks.html
#> Device     390 × 700 @2x · dark
#> Target     `.task-done` → 8 matches
#>   1  <button type="button" class="task-done btn btn-sm btn-outli…
#>      hidden · enabled · at 306,324 · 55 × 31
#>   2  <button type="button" class="task-done btn btn-sm btn-outli…
#>      visible · enabled · at 306,372 · 55 × 31
#>   3  <button type="button" class="task-done btn btn-sm btn-outli…
#>      visible · enabled · at 306,420 · 55 × 31
#>   4  <button type="button" class="task-done btn btn-sm btn-outli…
#>      visible · enabled · at 306,476 · 55 × 31
#>   5  <button type="button" class="task-done btn btn-sm btn-outli…
#>      hidden · enabled · at 306,541 · 55 × 31
#>   6  <button type="button" class="task-done btn btn-sm btn-outli…
#>      visible · enabled · at 306,606 · 55 × 31
#>   7  <button type="button" class="task-done btn btn-sm btn-outli…
#>      visible · enabled · at 306,671 · 55 × 31
#>   8  <button type="button" class="task-done btn btn-sm btn-outli…
#>      visible · enabled · at 306,728 · 55 × 31
#> Recording  off · cursor hidden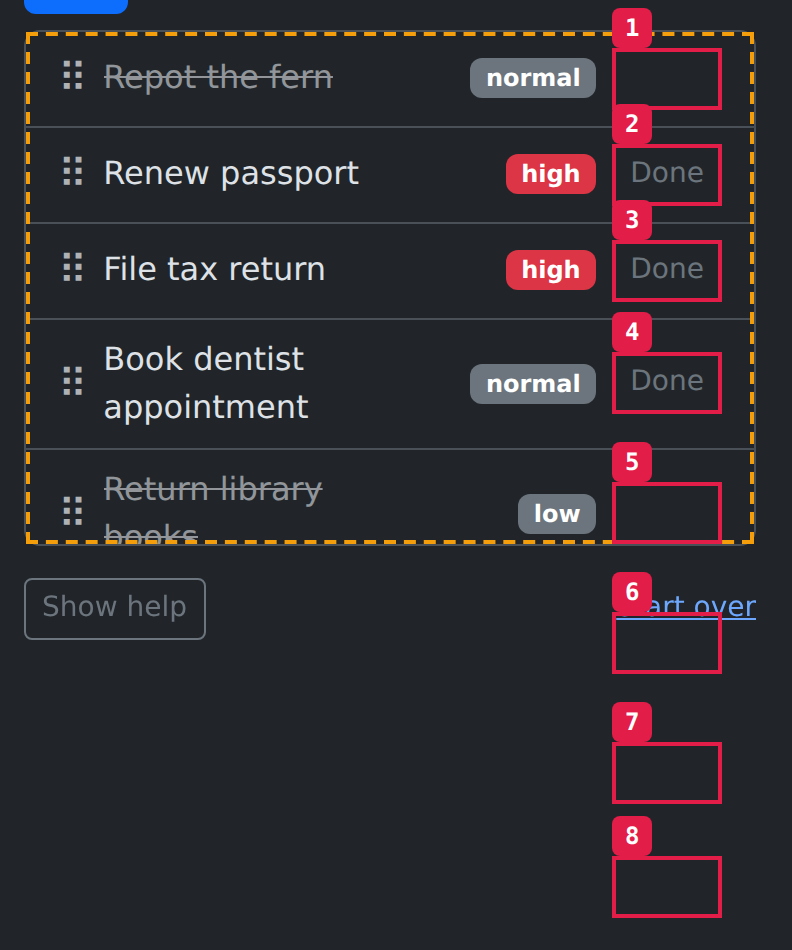
.task-done matches one button for each task. The page
hides the Done buttons of finished tasks, so pz_inspect()
lists them as hidden. An action targeting one of them would
wait for it to become visible, then time out. With
show = "screenshot", pz_inspect() also saves a
screenshot with the matches outlined and numbered.
We’re done with the browser, so let’s close it:
pz_close(page)Browser tests
You can write browser tests with the same functions we used to record the demo. paparazzi stages steps only while it records, so outside a recording your steps run at full speed.
Browser tests are tricky because the page keeps changing as you use
it. We saw this earlier: our code ran faster than the app could save the
new task, so pz_get_text() read the old first task.
paparazzi handles the waiting for you. You state what should
happen, and paparazzi waits until it does or stops if it doesn’t.
Actions wait for their element to be ready, and expectations retry until
the page shows what you expect.
paparazzi also works inside testthat, with the same syntax. testthat
counts each paparazzi expectation as a test expectation, so a failed
expectation is a test failure, and pz_local_page() closes
the page when the test ends. Here are the steps of our video as a
test:
test_that("a new task goes to the top of the list", {
  page <- pz_local_page(pz_example("tasks"))

  page |>
    pz_act_type("Repot the fern", target = "#task-title") |>
    pz_act_click("#add-task") |>
    pz_expect_text(
      "Repot the fern",
      target = pz_loc(".task-title", which = "first")
    )
})
Where to go next
We’ve now built a demo video from a script: we drove a page with actions, kept the script in step with expectations, and framed, staged, and annotated the recording. From here:
- The in-depth app walkthrough puts the recording features together into a longer demo video, with camera moves, captions, callouts, and redactions working together across several steps.
- The annotations article shows every kind of annotation, including marks, callouts, spotlights, redactions, and captions, and how to style, frame, and clear them.
- The Shiny apps article shows how paparazzi starts Shiny apps, waits for them, and sets their inputs, and how to test them.
- The function reference lists every function by task, with an example for each.